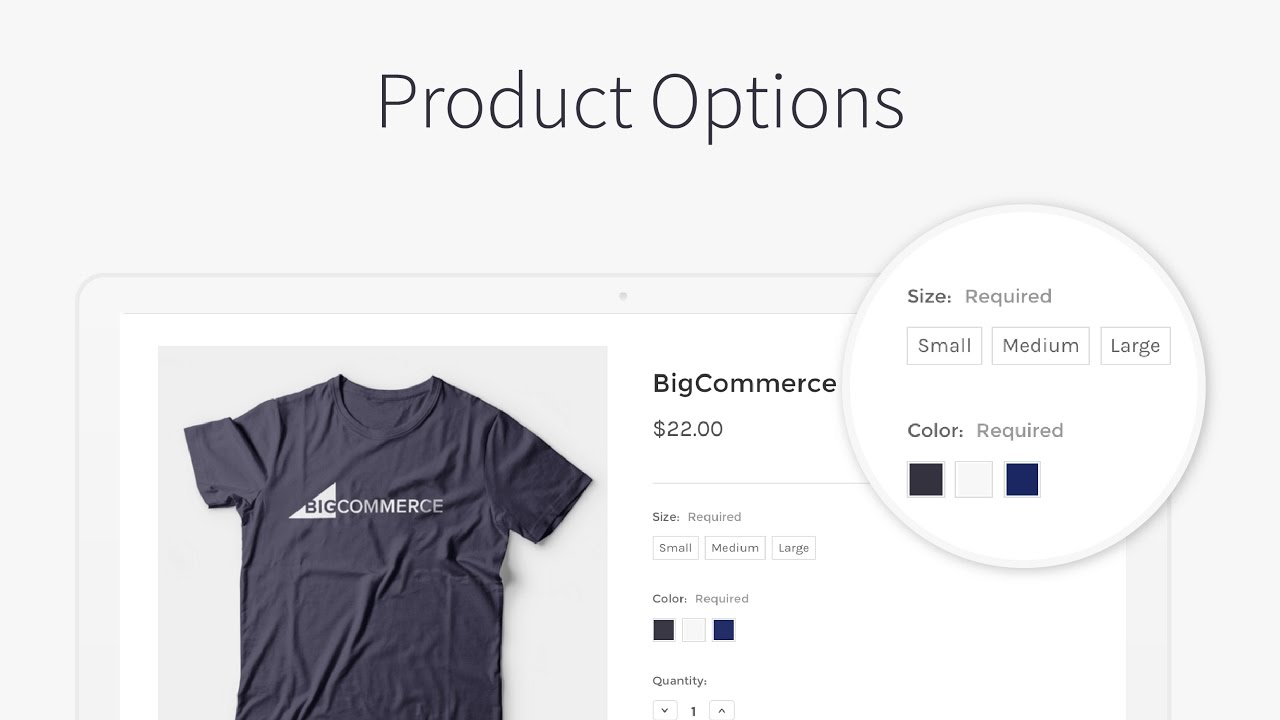
Bigcommerce Pick a Size and Upload a File
Practise you wish to give product variations in terms of calibration, color, or material? Do you have customizations such every bit engraving or specific delivery date? You volition be able to add variations to your products using Bigcommerce production options. This commodity will teach yous how to create production options, such as size and color and how to create option sets and use them to products.
How does the Product Pick role?
A product option refers to a production that comes in several variations. In that location are several similar types of choices for products, such equally size and colour, only they can as well be things like checkboxes and fields that describe things.
Every product consists of multiple values. Also, sizes: modest, medium, and big will be available. Values for certain selection forms, such every bit custom text fields or file upload fields, are created by the shopper. Besides, a variant is a specific variation of a product with given option values, such as a modest, blue shirt.
You may add together a necessary option to items that demand it (like the size for wear). That means the shopper must commencement pick a value (such as modest) before adding the detail to their cart. Not-required options can likewise be adult. That is, the shopper has the option to select/enter a value but is non required to do so. This is useful for add-ons or customizations such as engraving.
SKUs, or stock-keeping units, are codes that tin can be assigned to items and variants to manage inventory. SKUs may be assigned to both the base product and its private variants in BigCommerce.
Rules are a method of irresolute product data (such as price, weight, or the image displayed) based on which value-combination or SKU the consumer chooses for their choices.
BigCommerce selection sets: Required vs. Optional
The variants you define in the BigCommerce settings are applied to your products. They tin exist customer-selectable, such as the size of the production or the color. Although the terms "necessary" and "optioned" are oftentimes used interchangeably, BigCommerce has two different ways of making options: required or optional.
Required production pick sets are inventory attributes that set the specifications for a concrete product. Such is the instance; for instance, a small-sized T-shirt would not fit on a medium-sized human body. The sizes must exist assigned to each product, and the choice choice must be required for each of these products.
Too, bear in mind that a single product can take several aspect sets. Just as having the right inventory sizing determines unique merchandise, and having a unique colour or design is simply as of import.
Optional choice sets are features that practice non bear on the inventory'south uniqueness. They are as well used for customization, such as personalized writing or T-shirt designs. A customer can choose a medium blue T-shirt (with two required options) and specify whether it should be uncomplicated, with only writing, with only graphics, or with both writing and graphics (i more optional option).
Differences betwixt v2 and v3 Product Options
If you're already well acquainted with the v2 Adding Products, you'll find that the product options are somewhat unlike in v3. Nosotros provide you a table containing all the differences of the ii available versions.
| v2 Production Selection | v3 Product Option |
|---|---|
| "variant" options and "modifier" options show no differences | In that location are two types of product options: Variations and Customizations |
| Variant data such as toll and weight are calculated using the base of operations product's data | The variant data is explicit as well as you can use modifier options to obtain computed values |
| Price and weight adjustment rules apply to whatever option form | Rules can only be extended to modifier options considering variant information is explicit |
| Production options must exist added to an pick gear up, which must then exist applied to a product | Option sets are not used since product options are created directly within the product |
| A custom formula tin can be used to produce SKUs automatically | Generated SKUs can be edited, but non in the format in which they are initially generated. |
Setup / configure v2 Product options
1. Create options
These 5 steps are to aid you add a product option and option set up to your product:
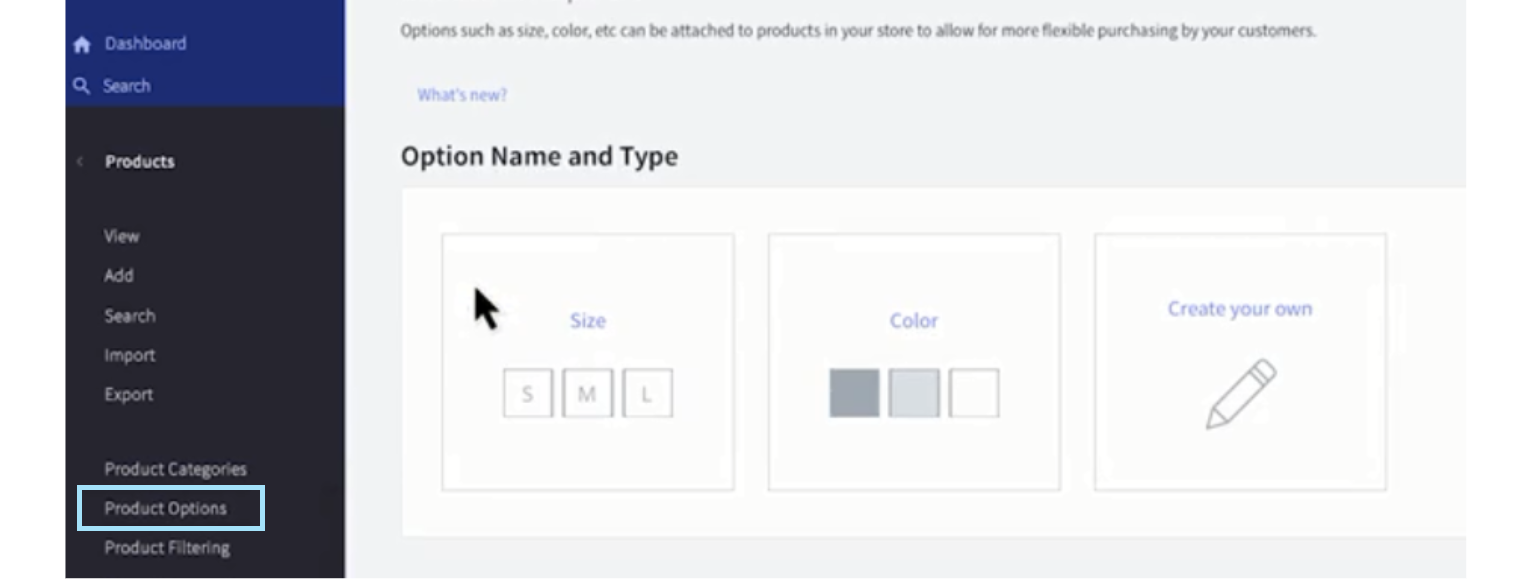
- Go to Products, so Product Options and cull Create an Option.
- Cull the kind of choice you desire to create, for example, size.
- Specify values for the option, if necessary, such as minor, medium, and big (for size).
- Apply the choice to an option set.
- Insert the pick set to your product.
2. Prepare the Option sets

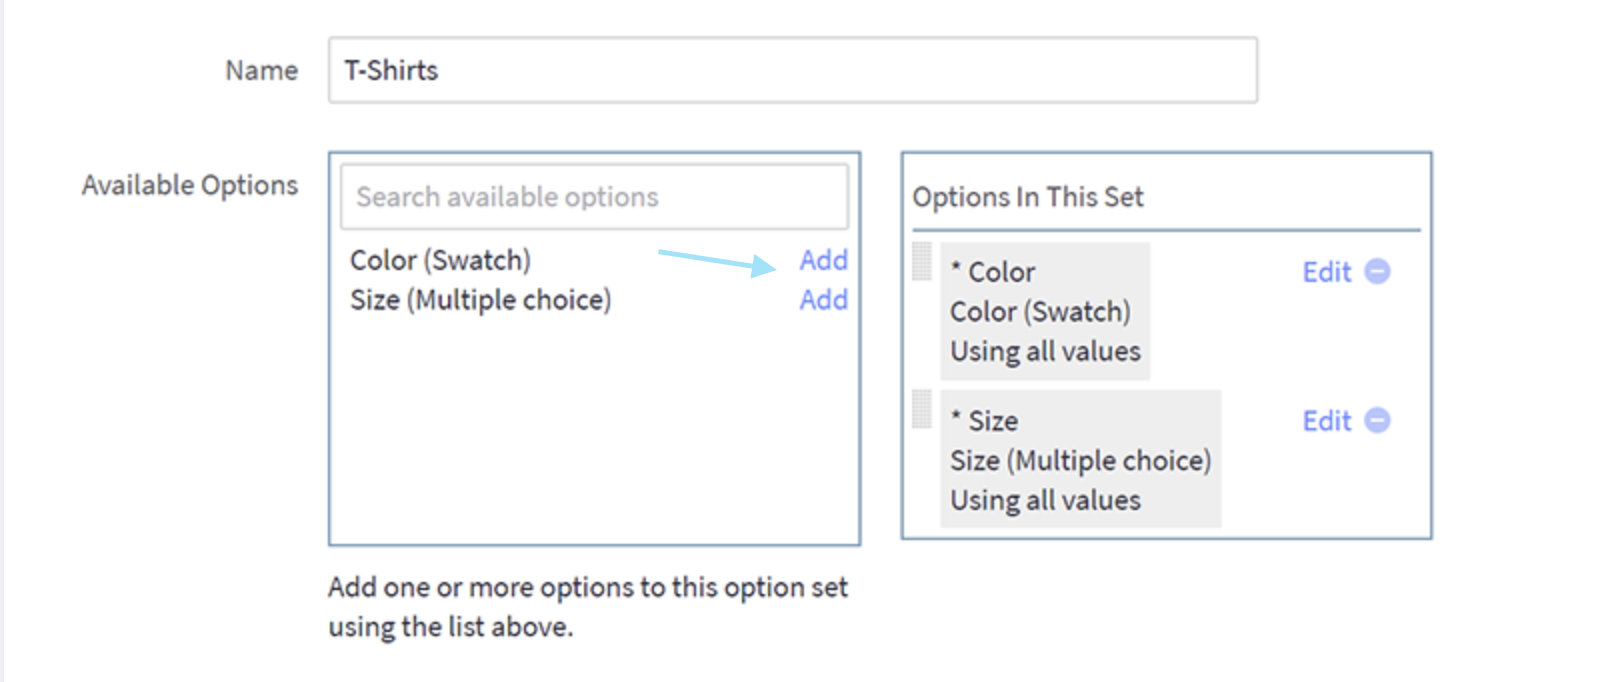
An option prepare is used to associate an item with an selection (or collection of options). For instance, if your product is a T-shirt, y'all can have an option set called T-Shirts that includes Size and Colour options. Before an selection can be added to a product, it must first be allocated to an option collection, since options are not practical "directly" to products.
Sets may be customized for a single product or shared through several products, eliminating the need to build new sets for similar products. Pick sets tin also be correlated with rules (such as adjusting the price depending on the selected options). In comparison to production-level rules, option set-level rules are reusable, since a unmarried ready may be assigned to several products.
Creating/Editing an Choice gear up
In guild to generate a new option set or edit an existing i, get to Products, click on Product Options, and choose the Choice Sets tab.
- To edit an existing option set, click its name; to create a new ane, click Create an Choice Set.
- The option fix Name is non visible on the storefront but is used to identify the product or company in the command panel, so give it a name that is descriptive of the product or brand.
- Press Add together next to the options y'all want to utilize in your product in the Available Options listing. They will announced to the right, nether Options In This Collection, when you pick them.
- To delete an option from the list, click the minus (-) button.
To delete a specific value (such equally Actress Minor from a Size option) or to modify the necessary status of a particular choice, click Edit next to the option under Options In This Set.
- Uncheck the boxes for any values that you do not wish to include.
- When an pick is marked as Required, an asterisk appears next to its proper name.
Utilise an Option set to a Single detail
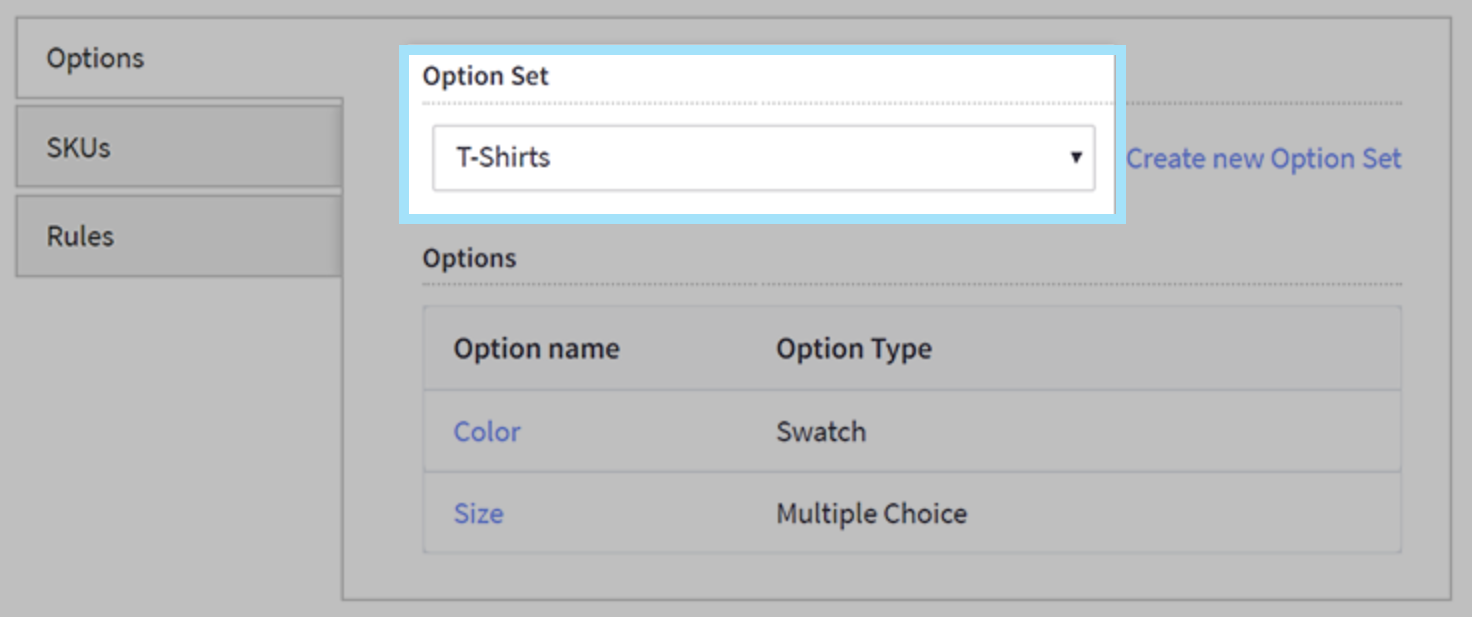
To assign an selection set up to an item, navigate to Products, select View and edit the product.
- Use the Option Set drop-downwardly on the Options & SKUs tab to apply a set. This will activate the left-side SKUs and Rules tabs.
- To remove an option prepare, click on None.
- Make a fill-in by saving your changes.
Apply an Choice ready to Multiple items
The Multi-Channel Product List does not accept applying an pick set in bulk (enabled when you connect eBay or Amazon channels). Withal, yous can still apply option sets in bulk through import.
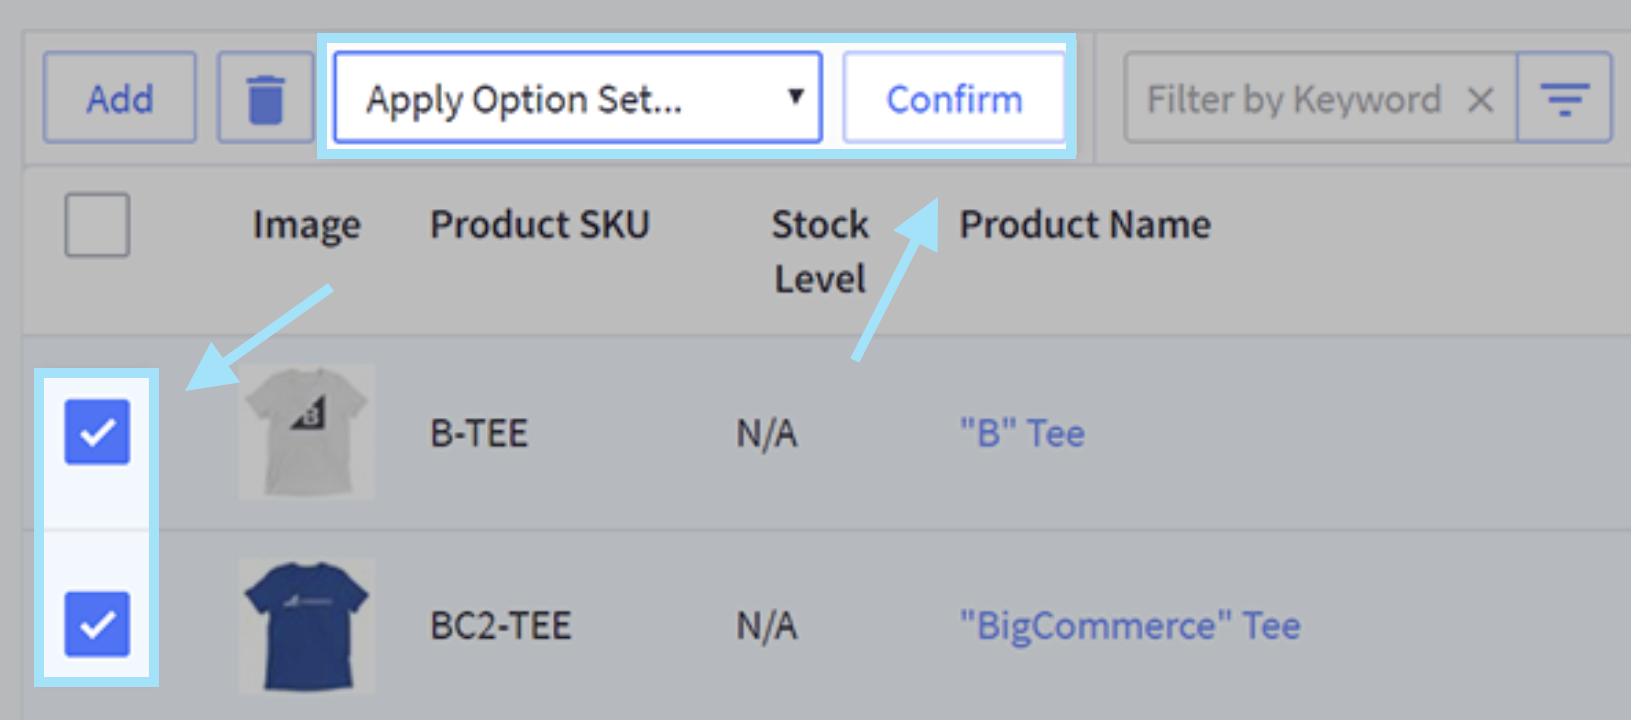
You may also add a choice set to several items at the same fourth dimension.
- Become to Products, select View and check the box to the left of each product to which the choice fix should be practical. Filter the product list using the search bar.
- Select Employ Option Set from the Choose an Action dropdown at the top of the list and click on Confirm.
- Pick the option set up you want to add to the verified items from the popup that appears.
3. Create SKUs
Important note: Variants
A product's potential combinations are known every bit variants or variations.
Additionally, you might also market place ii sizes (S and L) and ii distinct colors (blue and red) in order to capitalize on this market opportunity. As there are 2 different sizes and 4 colors in this product, this production has four versions.
SKUs are commonly used to identify variations for inventory monitoring purposes. For case, a pocket-sized, red shirt, might exist something like SHIRT-SM-RD in the SKU.
The word variants and SKU tin be used to describe more than than just choices like colour or height, in fact, SKU tin can be generated for the following options:
- Colour
- Size
- Swatch
- Multiple pick
- Product pick list
- Checkbox
SKUs tin can be manually entered or generated automatically using the Auto-SKU Generator. To create a SKU, edit a production, click on the Options & SKUs tab at the peak, then choose SKUs, and select Create an SKU.
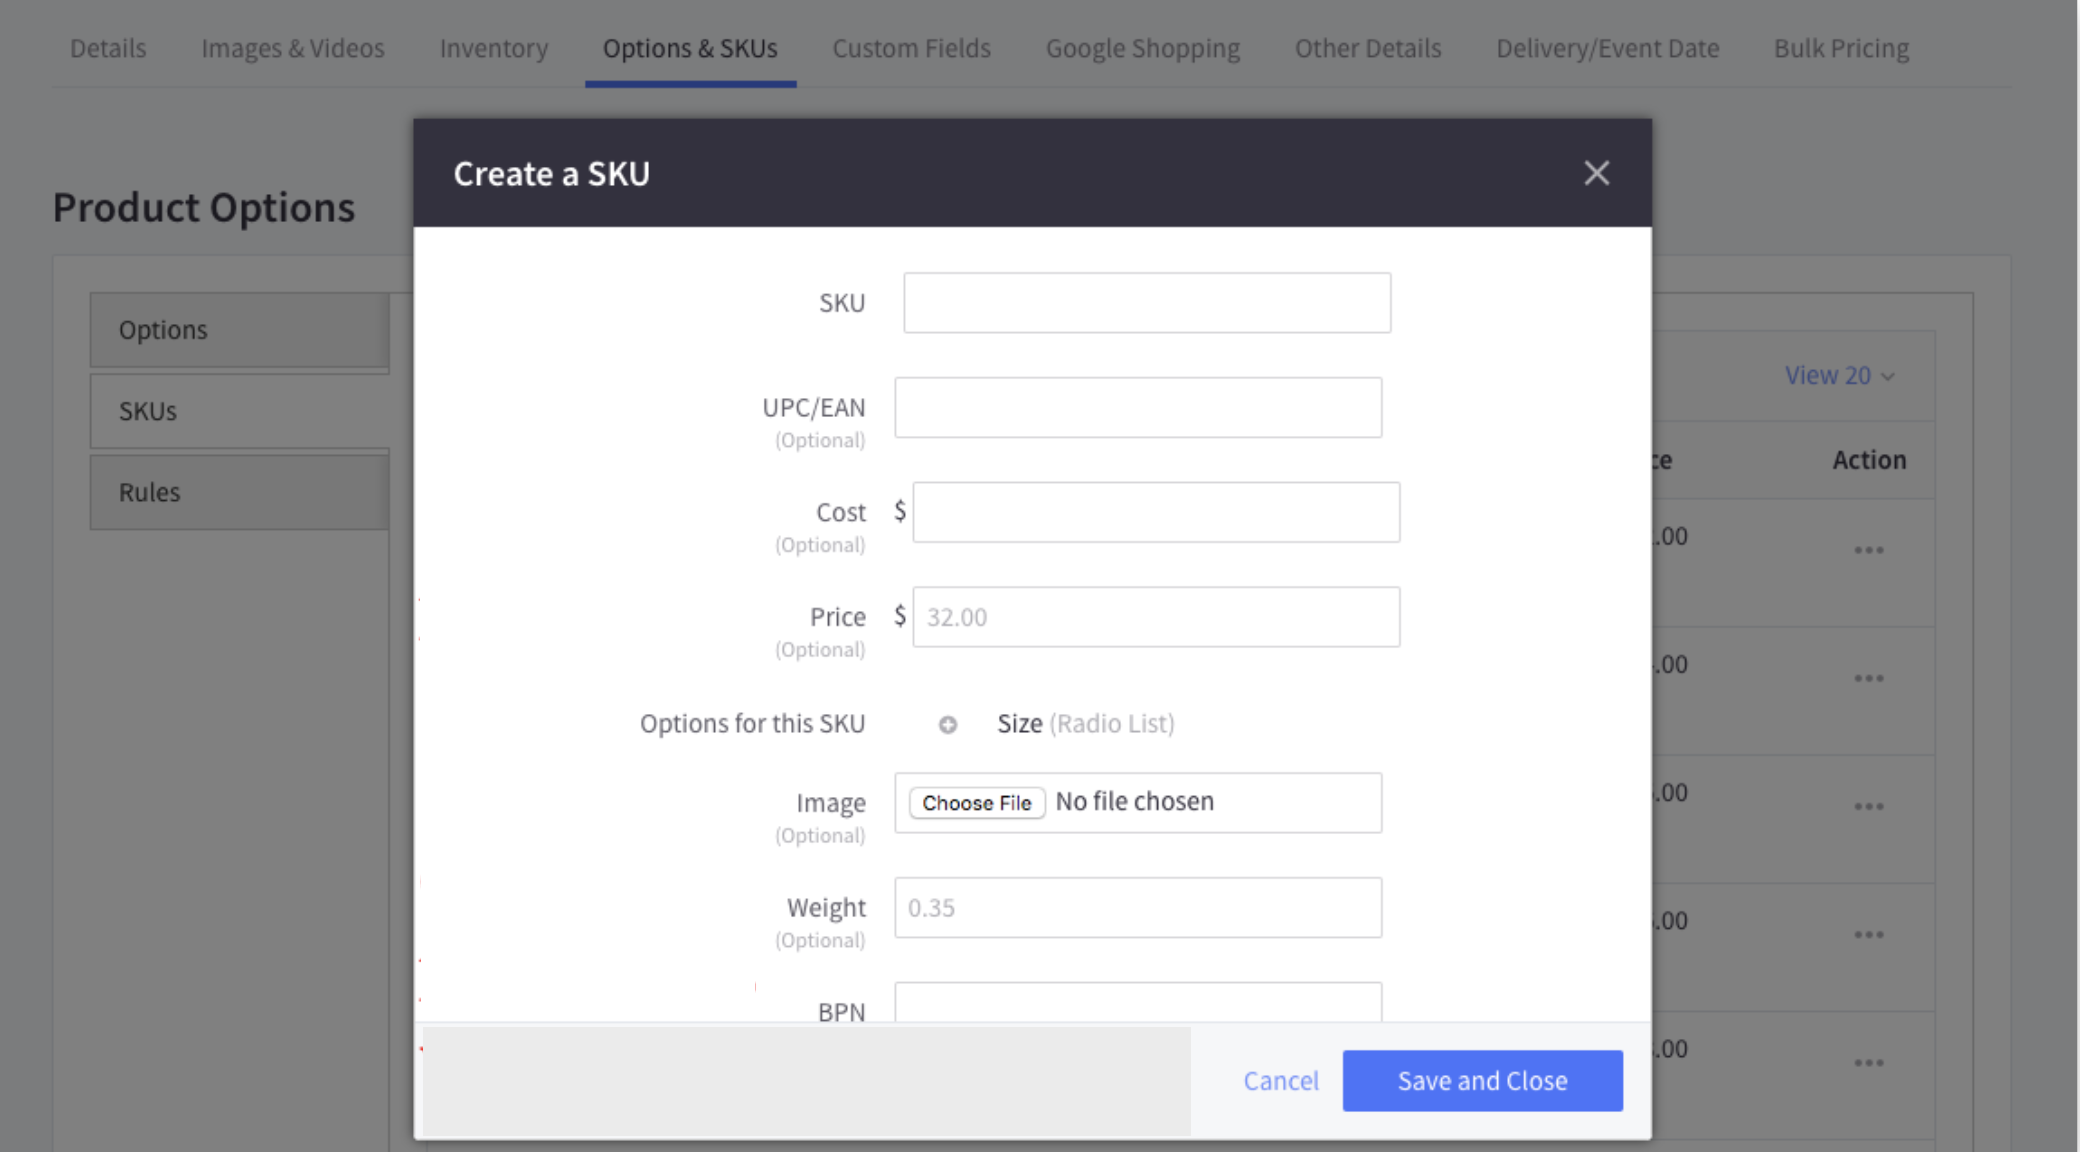
Fill out the following SKU data in the popup that appears:
- SKU (required): production lawmaking for the variant/variances.
- UPC/EAN: UPC or EAN of variants.
- Cost: variant cost, mainly used for bookkeeping purposes.
- Cost: In terms of wanting this SKU to have a different cost from the base product.It will become the new base of operations price prior to the application of any price adjustment guidelines or discounts.
- Options for this SKU (required): Choose the values that should be assigned to this SKU. These are filled in using the related options.
- Epitome
- Weight: Use if y'all want this SKU to be heavier than your base product. It volition be used as the starting point for whatsoever rule changes. If enabled/offered, this is used in real-fourth dimension shipping quote calculations.
- Width, Pinnacle & Depth: SKU physical dimensions; used in real-fourth dimension delivery quote measurements if enabled/offered. These fields tin too be modified in bulk.
- BPN: Bin Picking Number; used to organize warehouses/logistics
- MPN: Manufacturer Role Number
- Enabled: Check to see if your customers can buy this SKU. If this selection is unchecked, you tin can enter a custom Purchasing Disabled Message.
Y'all tin can also use the following ShipperHQ-specific fields if you lot have ShipperHQ enabled.
- Shipping Groups: Diverse shipping choices are available depending on the product purchased.
- Dimensional Rules: Typically used for goods that are packaged differently or separately from the remainder of the products.
- Origin Locations: assign an origin location if yous ship from several locations.
4. Create rules
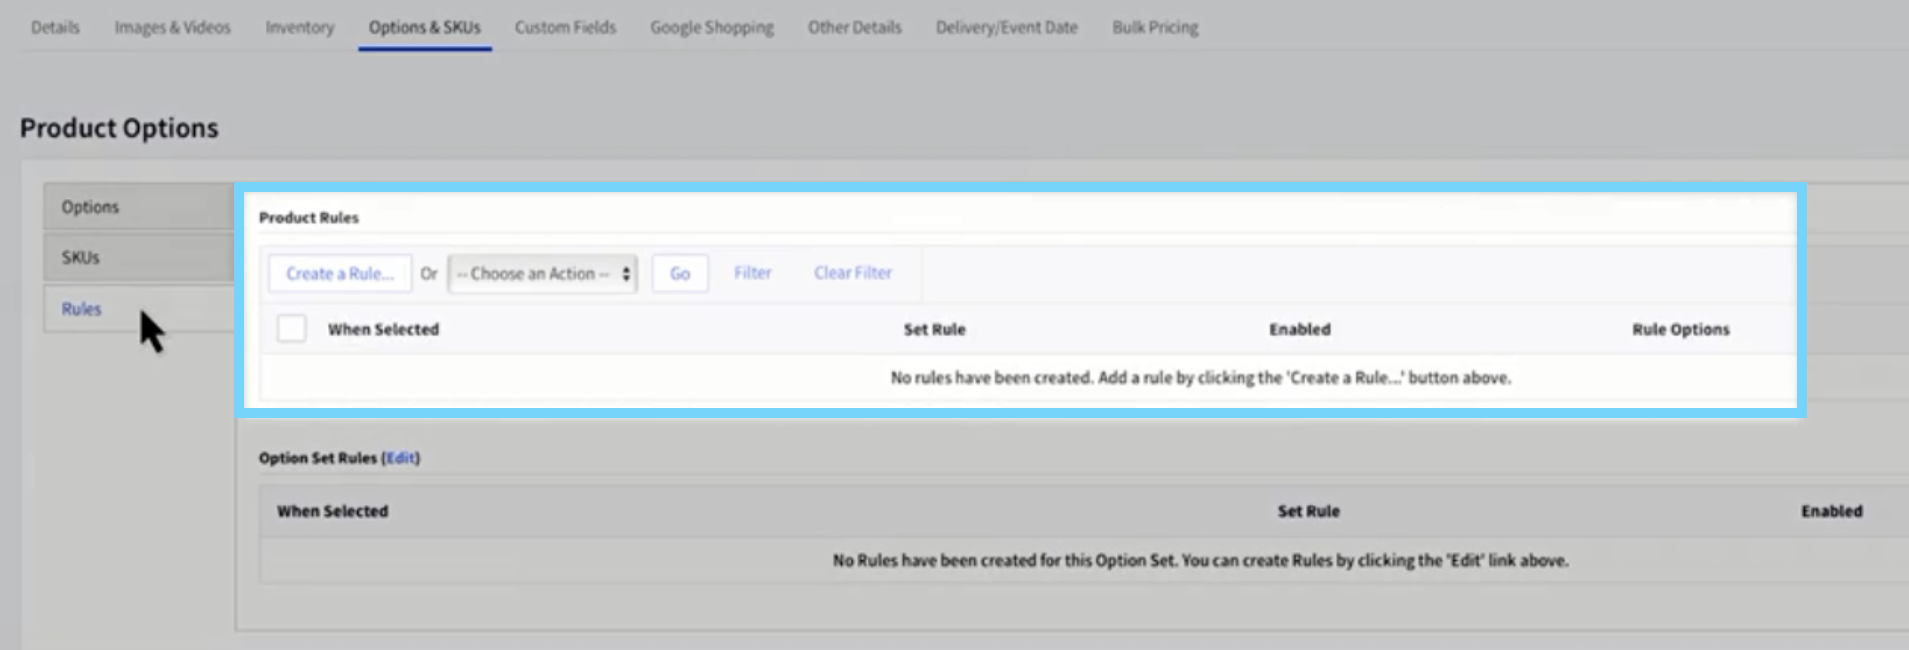
You can create certain rules in terms of adjusting the price, modifying the weight, making it unavailable for purchase, showing other images, and terminating the processing rules. Rules may exist added to individual products or multiple products at the same time past assigning a bulk selection set.
Rules can simply be generated for the certain post-obit options:
- Color
- Size
- Multiple selection
- Swatch
- Checkbox
- Product lists
On the other manus, other types of options, such as text fields or date fields, cannot take rules applied to them.
While creating a rule, you may wish to limit its awarding to a unmarried item; you would brand a production-specific rule in this case. If you choose to extend the rule to different, related products simultaneously, y'all can produce an option prepare-based rule that applies to all products that use the same choice gear up. Additionally, rules can be imported via a CSV file.
To create a rule, edit a production and then press the Options & SKUs tab at the top. To create a rule, click Create a Dominion. Choose the option/combination of options that you desire to apply the rule to for When These Are Selected.
- To pick them, select the plus (+) adjacent to the option's name and make your pick.
- Put a checkmark next to or adjustment you want to make when the customer chooses one of the options or combinations above.
- You may demand to include boosted information for some kinds of rules
Kinds of rules
ane. Change the Price
When a specific value or combination of values is chosen, this rule allows you to suit the price. You can increase or decrease a specified corporeality (in your currency) or percentage. Additionally, y'all should specify a fixed price. Zero cannot be a fixed price.
ii. Change the Weight
When a specific option or combination of options is called, this rule allows yous to adjust the weight. Yous may increase or subtract the weight (based on your Physical Dimension Settings your Shop Settings). Additionally, you should specify a fixed weight. A constant weight cannot be zero.
3. Make it unavailable for purchase
This dominion may be used to hibernate or make unavailable a specific choice or combination of options. Y'all have ii alternatives:
- Hide the choice: Employ to hide a specific value or set of values from the customer. For instance, if you sell a shirt in a diverseness of colors and sizes but do not want customers to run across the red shirt, yous may cull to muffle it.
This will muffle all occurrences of the values y'all option, rather than focusing on individual combinations. Selecting both small and red options, for example, would mask the small and carmine options.
Selecting to cover an SKU has the aforementioned impact equally selecting to display information technology as unavailable.
It cannot generate conditional choices (e.k., if the customer chooses small, hide cherry-red as an option). For information on configuring conditional options, run across Configuring Conditional Options.
- Testify Unavailable message: Used to display an 'unavailable' bulletin when the customer selects a particular choice or combination of options.
4. Display a different paradigm
When a specific choice or combination of options is chosen, this rule modifies the master production prototype. To be picked, the picture must exist saved to your screen. This feature is not compatible with the Prototype Director. Cull Scan to browse for a new picture on your screen.
5. Cease processing rules
This dominion ensures that if a dominion is activated, no subsequent rules are triggered. For instance, you can utilise this if you have a rule that increases price by $50 and some other that increases price by $5 for something else, only you don't want to add together the $5 if the customer has already chosen the $fifty option.
5. Set the Color
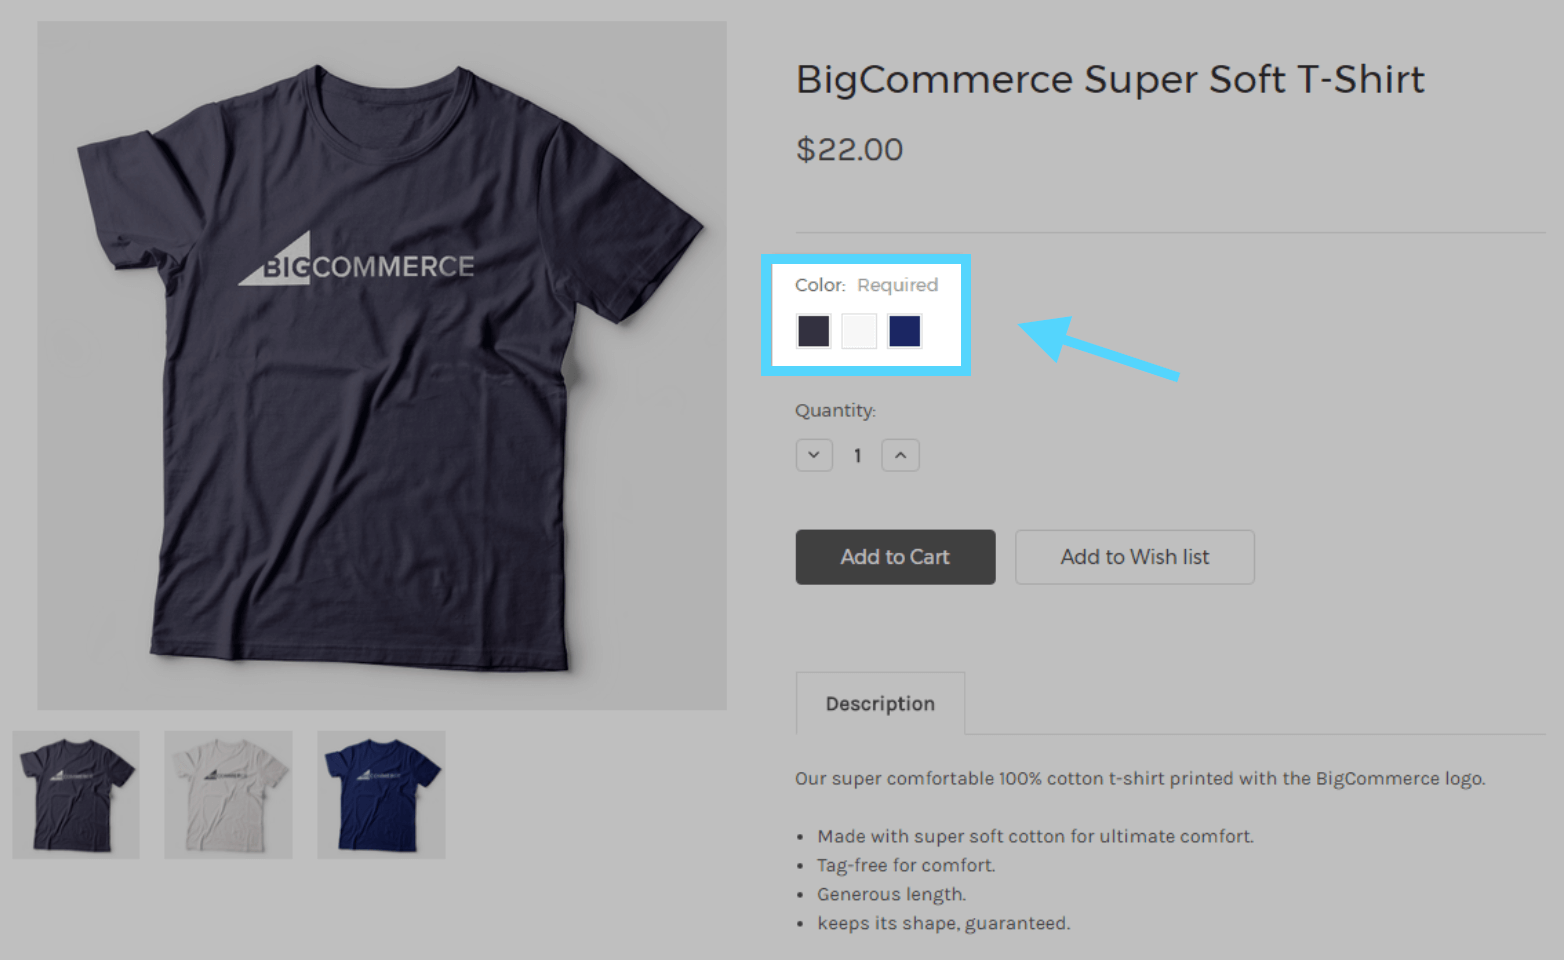
The colour display blazon is used to convey data about the color of a product or ane of its traits. It is also used to describe items that come up in a variety of colors, such every bit clothes.
- To add a new color, select whatsoever plus (+) button.
- To remove a color, cull the minus (-) button adjacent to it.
The Color section includes:
- Option Proper noun: Give your choice a proper noun. This is for comparison purposes only and is not displayed on the storefront.
- Colors: The color or pattern's name. This is visible only when the customer'southward arrow is hovered over the swatch.
- Hex code: If you have a hexadecimal code (a six-digit color code) for a specific color that you want to employ in your swatch, enter it here. The swatch color volition be automatically filled in.
- Swatch of pigment: Click to open the colour picker, and then cull a color for your swatch.
6. Set the Size
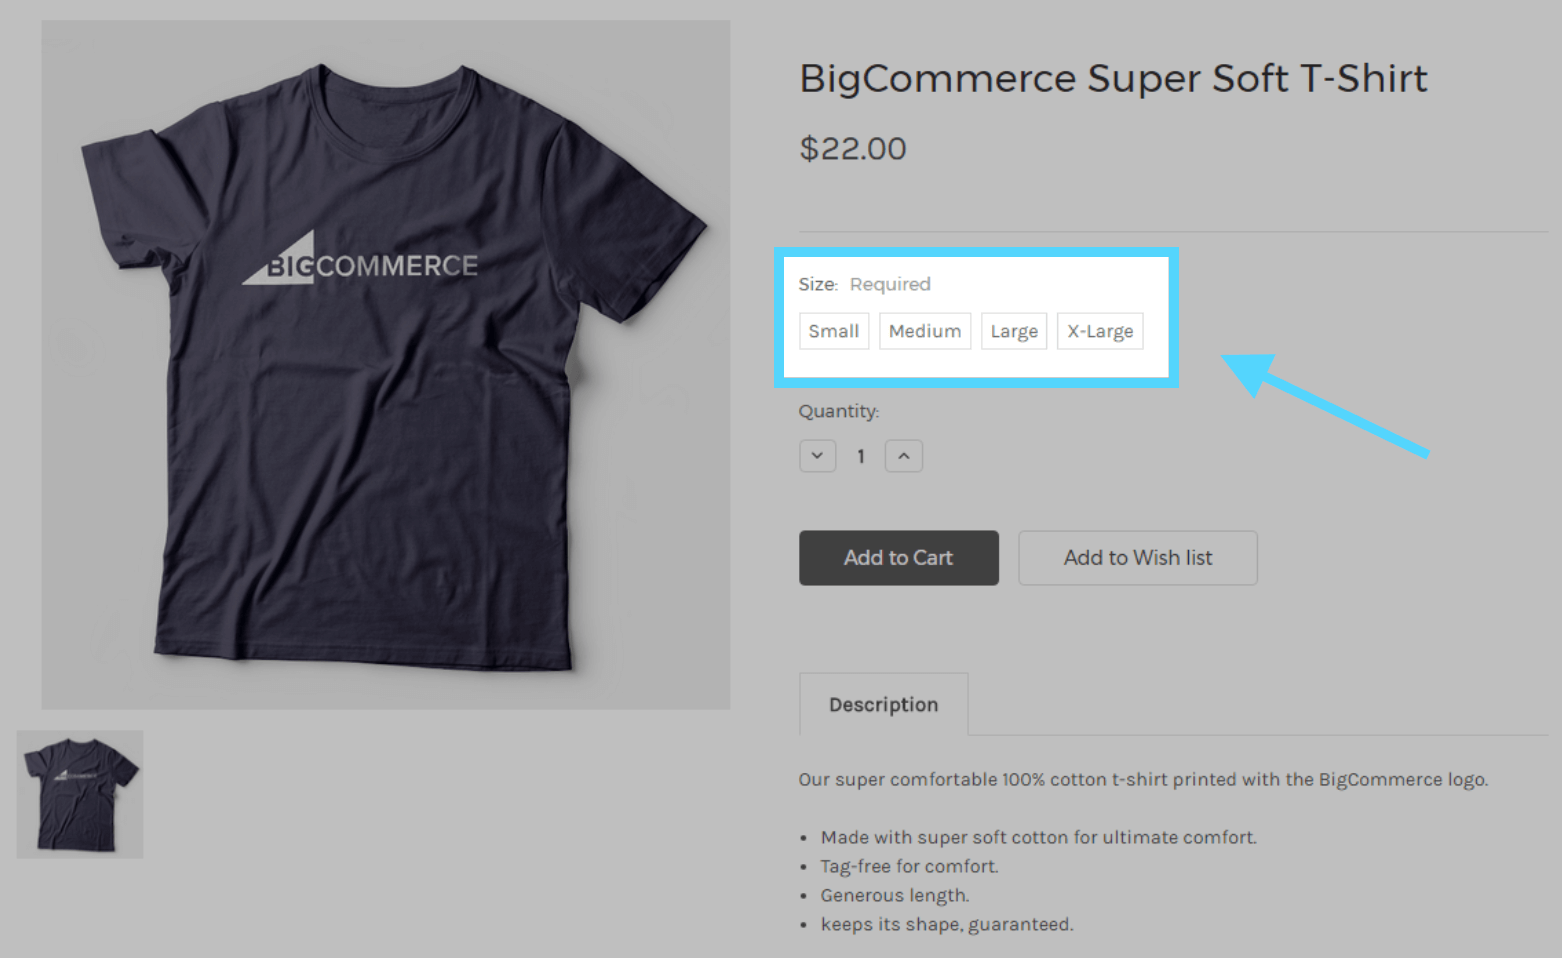
You utilize the size information display type to testify what size products are available. It is often used to refer to items that come in a variety of sizes, such every bit wearing apparel, shoes, or food. This choice will show the information in a rectangle format. If you'd rather accept your sizes displayed in a drop-down menu or radio buttons, consider a multiple choice option.
- As well add a new size, click on whatsoever plus (+) button.
- To delete a size, select its minus (-) push button.
The Size department includes:
- Choice Name: Specify the choice'due south proper noun (internal only, for keeping runway of options)
- Values: Each line should include i of the sizes you lot wish to sell.
- Brand Default (optional): This feature allows y'all to choose a default size. If desired, the customer will choose a different size.
7. Enable Multiple selection
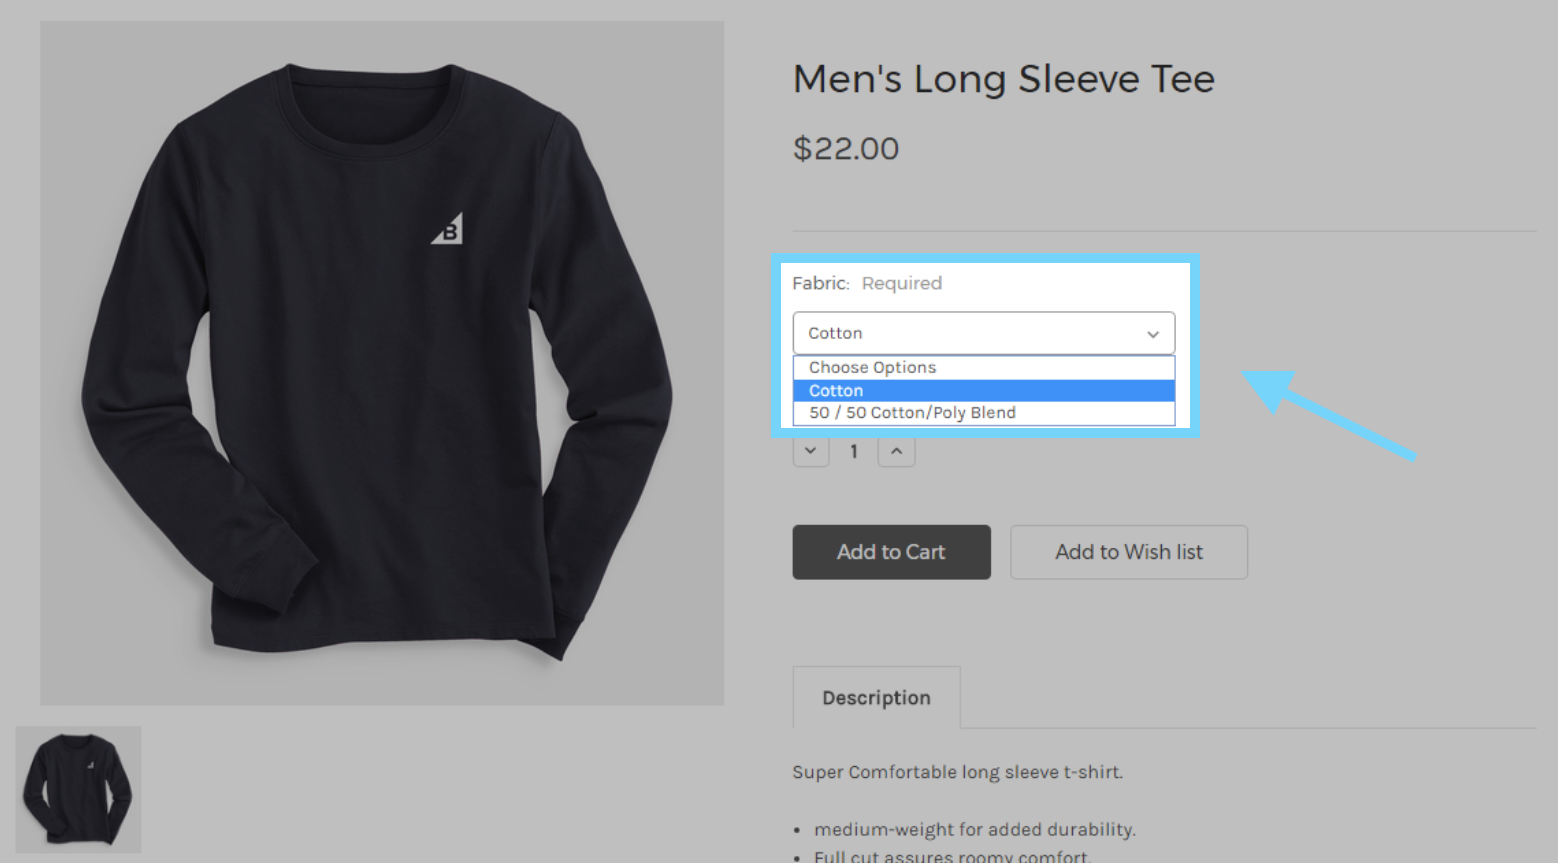
Customers may cull a specific value from a listing, such equally a color from a range of colors or a material from a range of materials, using the multiple choice display type. This choice is typically used to assist shoppers in selecting a specific variant of a commodity.
For example, a multiple-choice display class could be used to give salsa with various extents of spiciness or a lunchbox with various characters. You can also mix several choices, such as a candy bar that comes in a variety of sizes and flavors.
Multiple-selection choices tin be presented in the form of a drop-down list, radio buttons, or rectangles.
The Multiple choice section includes:
- Option Name: This field is for reference purposes but and is not shown on the storefront.
- Brandish Name: The label that appears on the storefront when an option is selected.
- Type of brandish: Multiple option
- Brandish Style: Select amid radio buttons, a driblet-downwards list, or rectangles.
eight. Enable the Checkbox
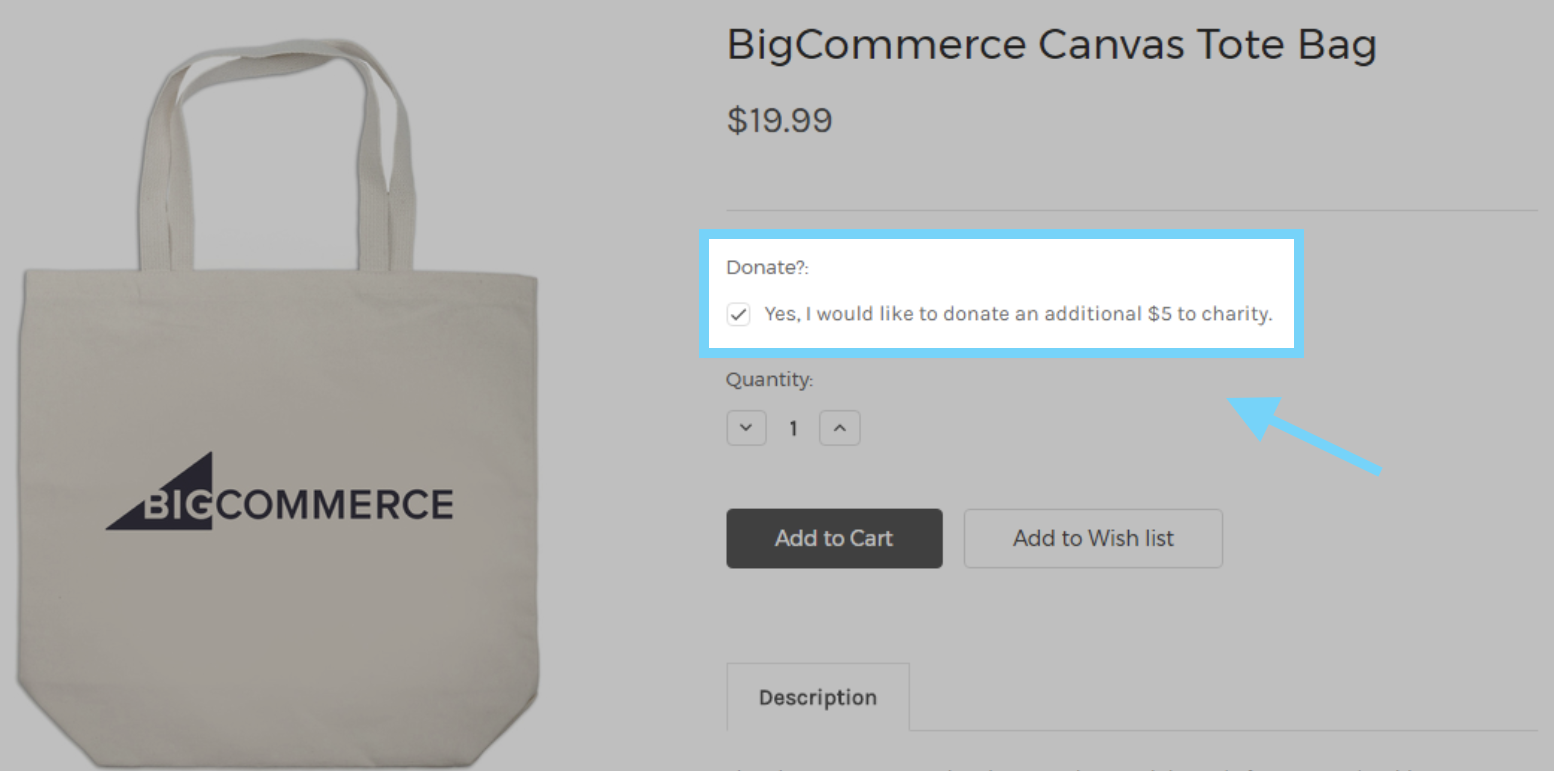
A checkbox brandish form enables the consumer to validate a single statement or add-on. It is oft used to provide bones service enhancements or to validate service terms.
This choice blazon can exist used in conjunction with pick rule logic to perform certain changes, such as changing the image, toll, or weight. For example, if you want the customer to add insurance for $5, you lot'd create a rule that automatically adds $5 when the Yep checkbox is checked.
The Checkbox section includes:
- Option Name: This field is for reference purposes only and is non displayed on the storefront.
- Display Proper noun: The label shown to the left of the checkbox on the storefront. For instance, would you like a complimentary keychain?
- Default Checkbox Status (Checked/Not Checked): Is the choice checked automatically (Checked), or must the customer manually option it (Not Checked)?
- Field value: Is shown to the right of the checkbox. For case, Yep, kindly include a costless keychain with my club.
9. Set the Swatch
The swatch display form is used to demonstrate a product's color or texture or one of its attributes. Information technology is likewise used to describe items that come up in a variety of colors or materials. For case, you might apply swatches to permit customers to cull from a multifariousness of material patterns.
The Swatch section includes:
- Swatch proper name: The colour or pattern name. This is visible but when the customer's arrow is hovered over the swatch.
- Swatch type: Choose whether the swatch will contain one, 2, three colors, or be a design (i.e. an uploaded image)
- Hex code: If y'all have a hexadecimal code (a vi-digit color lawmaking) for a specific color that you want to apply in your swatch, enter it here. The swatch colour will be automatically filled in.
- Color swatch: Select to display a color picker, so choose the colour for your swatch
- Upload image: If y'all're using a texture or design, you lot tin upload an prototype of information technology. Information technology will be resized automatically to match your manner.
ten. Set the Text/number field
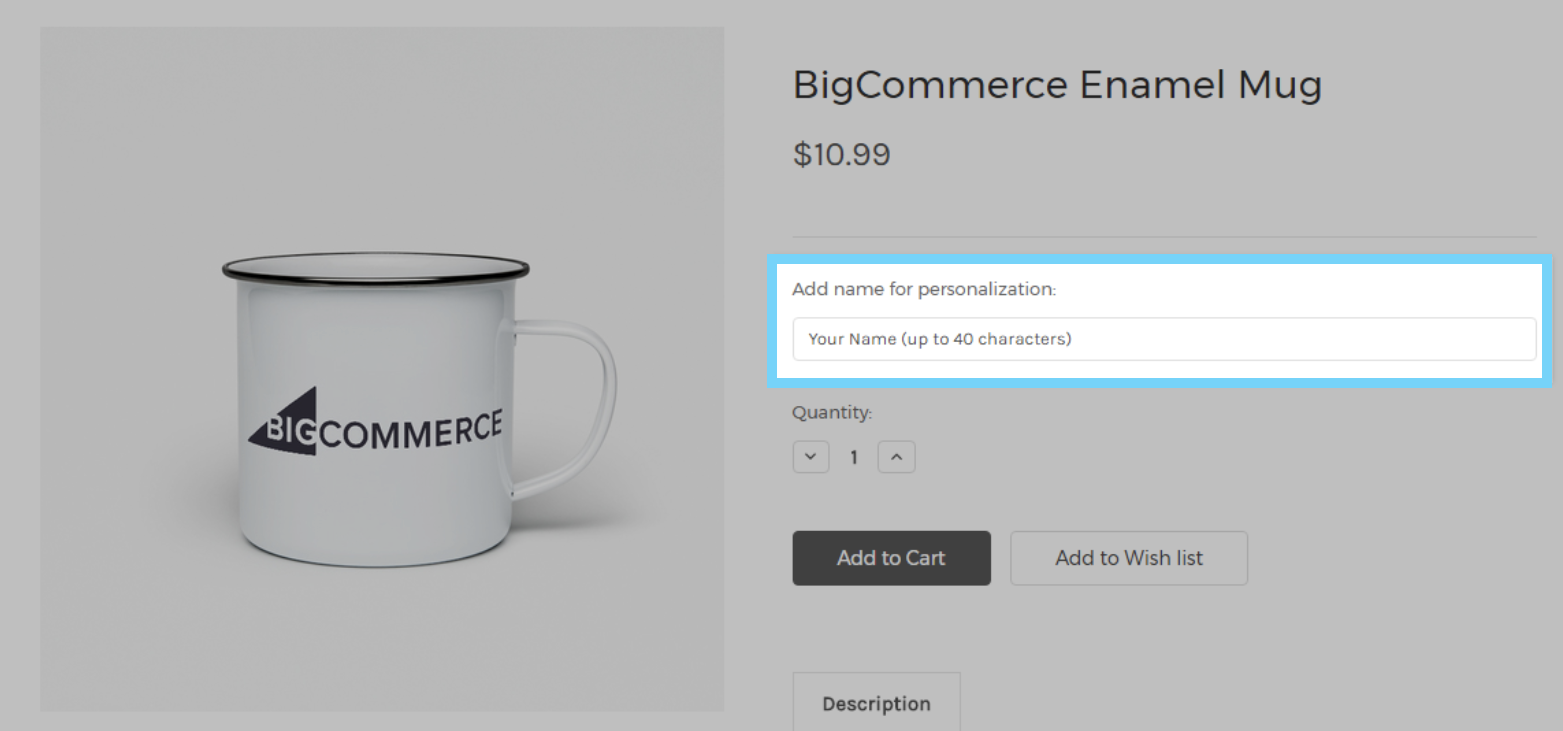
Your customer can insert email, messages, or numbers in the text field options to connect with the product they're ordering. They're an excellent manner to permit shoppers to customize items and can besides be used to give you unique details or requests. Custom messages or words for engravings or embroidery are often entered into text fields.
When creating a text field option, you lot can specify the maximum number of characters, lines, and the blazon of data that your customer can enter (alphanumeric or numeric just). Text fields are non compatible with toll changes or whatsoever other option rules.
Details of Text field:
- Default Value (optional): Insert text that your shoppers can overwrite (due east.thousand. Recipient's name).
- Validate Length: You can fix a range for character limitation if it is checked.
- To the lowest degree: The minimum number of characters can be entered
- Virtually: The maximum number of characters can be entered
- Utilise 0 to not fix a particular limit.
Details of Multi-line Text field:
- Default Value (optional): The text independent in the text field by default; can be overwritten past your client.
- Validate Length: Cheque in the box abreast either pick to limit the number of characters or lines tin can be entered.
- To the lowest degree: The minimum amount of characters/lines that tin be entered
- Most: The maximum corporeality of characters/lines that tin can be entered
- Use 0 to non set a item limit.
Numbers-simply field
- Default Value (optional): Add a sample number that your customers can overwrite.
- Limit Input: This will limit the everyman value, the highest value, or both, if it is checked. Use 0 to non set a particular limit.
- Whole Numbers Simply: Merely whole numbers can be entered if it is checked.
eleven. Set the Appointment field
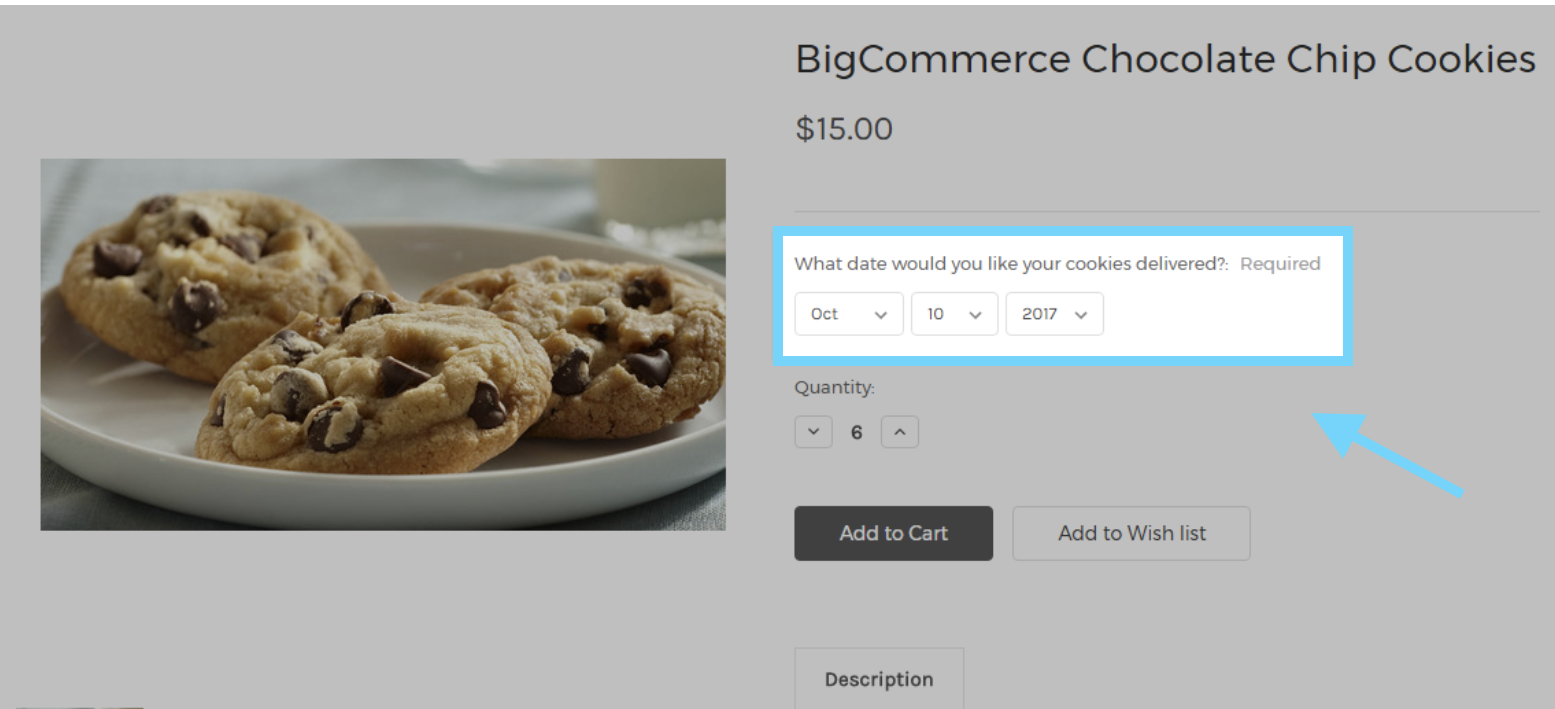
The engagement field display form enables the customer to pick a date from drop-down menus for the calendar month, twenty-four hour period, and yr. Information technology is often used for fourth dimension-sensitive appurtenances or services. For instance, you might add a date field to let recipients to specify a delivery appointment for a surprise souvenir or a concert engagement when purchasing concert tickets.
The Date fields department includes:
- Default Value (optional): If you select a date range, it will exist automatically applied until the client changes it.
- Limit Appointment Range: You lot can limit the primeval date available, the latest date available, or both (date range) if information technology is checked.
12. Use the File upload field
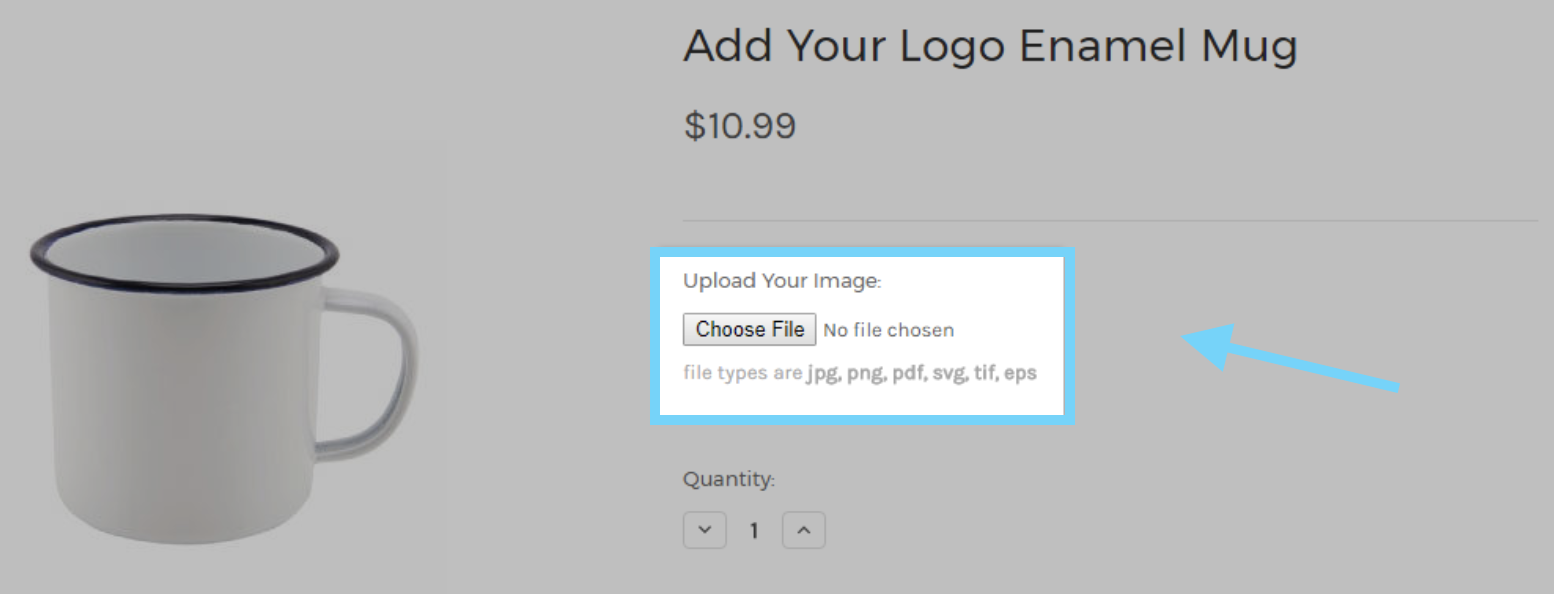
The File Upload Field enables your customer to attach a file from their computer to the product details. This is mostly achieved with regard to custom printed items. For instance, you might use a file upload field to collect your customers' logos for printing on your product.
The File upload field section includes:
- File Types: Specify whether you desire customers to be able to upload files of either kind or simply the following: images and photos, documents and text files, and other (specify the extensions you accept, separated past a comma (pdf, mp3, zip)).
- Maximum File Size (in KB): Insert the maximum file size that your customers are permitted to upload, or enter 0 to remove the restriction. The server will continue to restrict the file size to approximately 500,000 KB (500 MB).
Uploaded files by customers
When viewing orders, you can access and import customers' uploaded files from the cart contents specified in the expanded gild information.
13. Select the Production Pick list
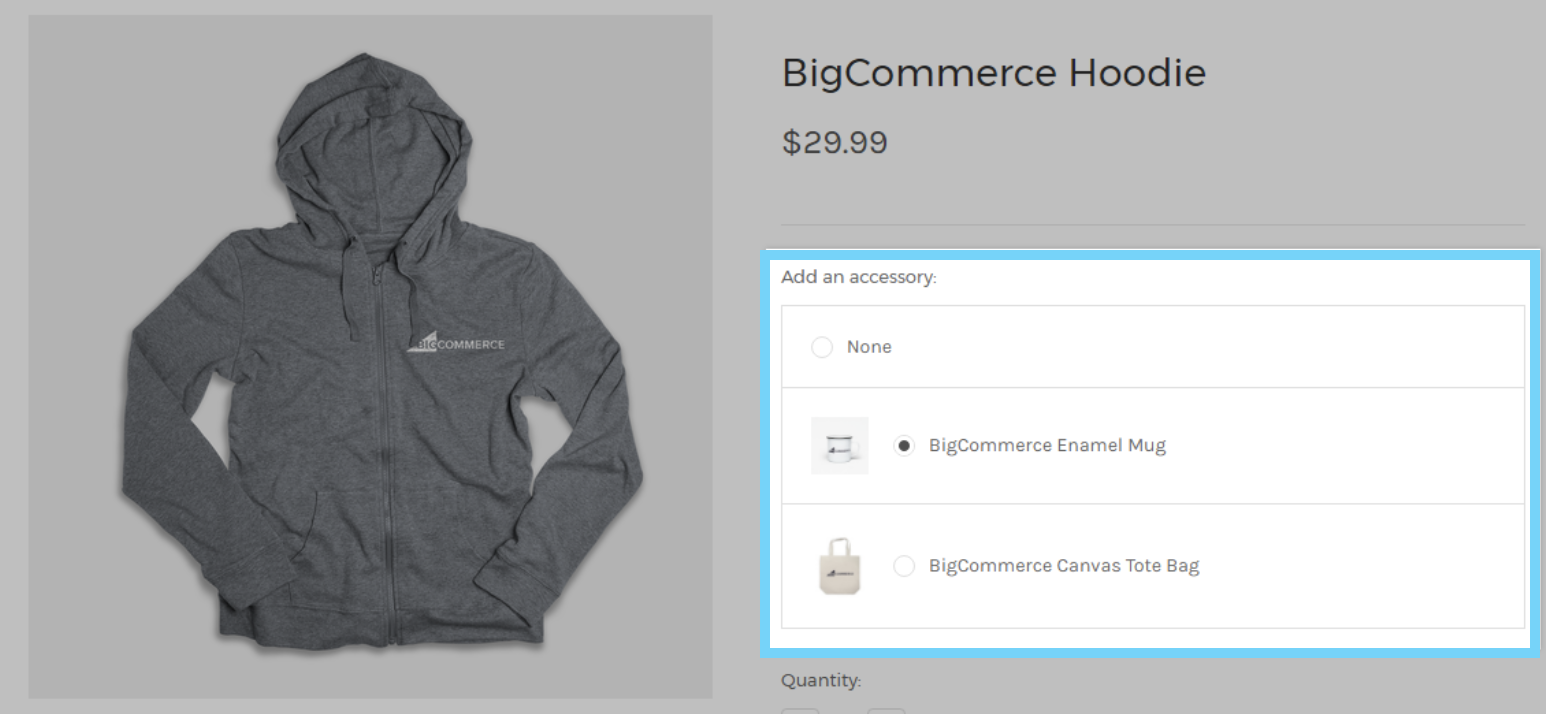
Customers are able to select and/can edit additional products when displaying another item on the product pick list. This can be used to upsell similar products and add-ons, every bit well as to combine products. The product pick listing choice has two primary uses: upselling related products and offering alternatives when bundling products.
Brand selection lists may be used to increment sales of similar or complementary goods. For instance, if one of your items is a book, you can use a product pick list to provide additional titles by the same author. You might even combine it with a price change rule or SKU product data to create a deal along the lines of "Add some other John Smith book and salve xxx%!"
Bundling Products
Additionally, you tin can use product select lists if y'all're selling a "bundle" of individually purchasable items. For instance, if you're selling a gift basket that includes a bottle of wine, a cheese, and crackers, you might apply product pick list options to allow your customer to choose which wine, cheese, and crackers to include. Each selection (wine, cheese, or crackers) will be a separate product option selection on the product selection list.
The Production choice list section includes:
- Brandish Style: Select betwixt a Pick list or a Pick list with pictures.
- Adjust Inventory: Select to modify the inventory for the optional item when a purchase is made.
- Arrange Product Cost: Select to add together the optional product's price to the main production'due south price – if you choose to add a different price, you can exercise so using a price change dominion or SKU product info.
- Factor For Aircraft: Include the weight and dimensions (package) of the optional product when computing the shipping quote.
- Default Pick: Choose which product would exist the default selection. (Cannot be selected before the post-obit phase of adding items has been completed).
Setup / configure v3 Production options
1. Create Variations
Variations/Variants are used to describe items that come in a diverseness of colors, sizes, and styles. Variation is too used to describe clothing that comes in a variety of colors and sizes. Variants can have their own picture, toll, and weight, as well equally their own SKU and inventory tracking.
Steps to create variants
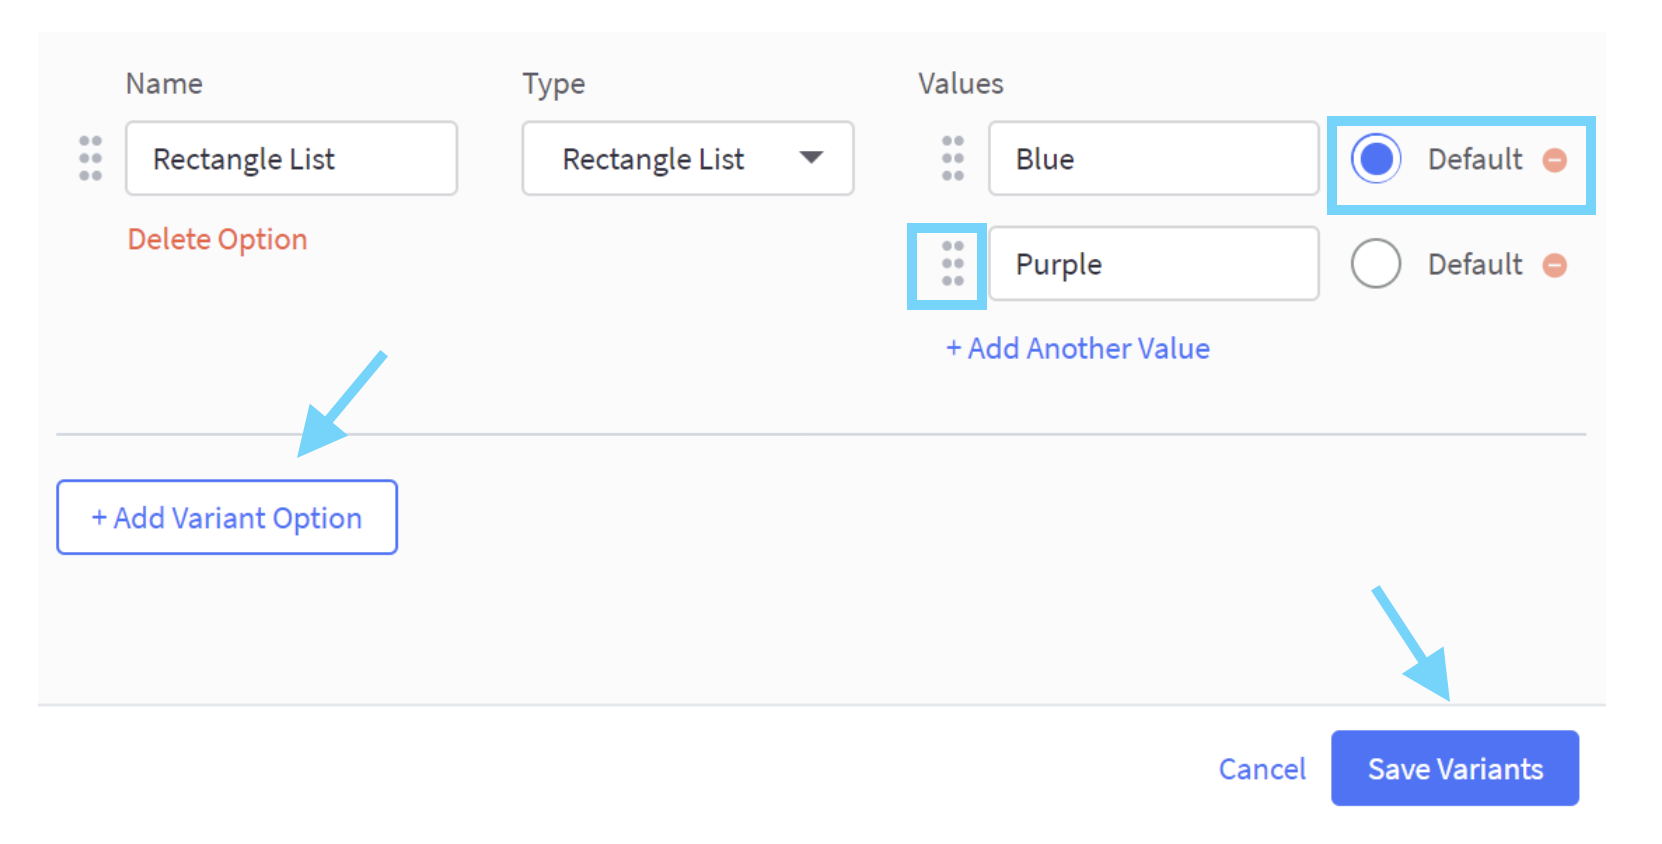
- Click + Add together Variant Option when creating or editing a product, or click Configure Options to edit an existing Variant Selection.
- Assign a proper name to your choice, specify its brandish type, and specify the values that should be available.
- To add additional values, click + Add Another Value.
- To delete an existing attribute, click the remove button (-) next to it. When a shopper enters the product detail folio, the default value volition be pre-selected.
- To rearrange the order of options and values on the storefront, click and elevate the handle to the left of them.
- Once done, click Save Variants.
After you've generated your variant options, a table chosen Variants will testify all of your product'south variations. This section functions similarly to a spreadsheet, allowing y'all to add, edit, and copy information (such equally price, image, and SKU) for specific variants. The Edit columns dropdown bill of fare will enable yous to testify/hide additional Sale Price or Weight fields.
If you want to copy a jail cell to ane or more rows immediately underneath it, you can relieve time by clicking the cell and then clicking and dragging its lesser-right corner. This also works for variant pictures.
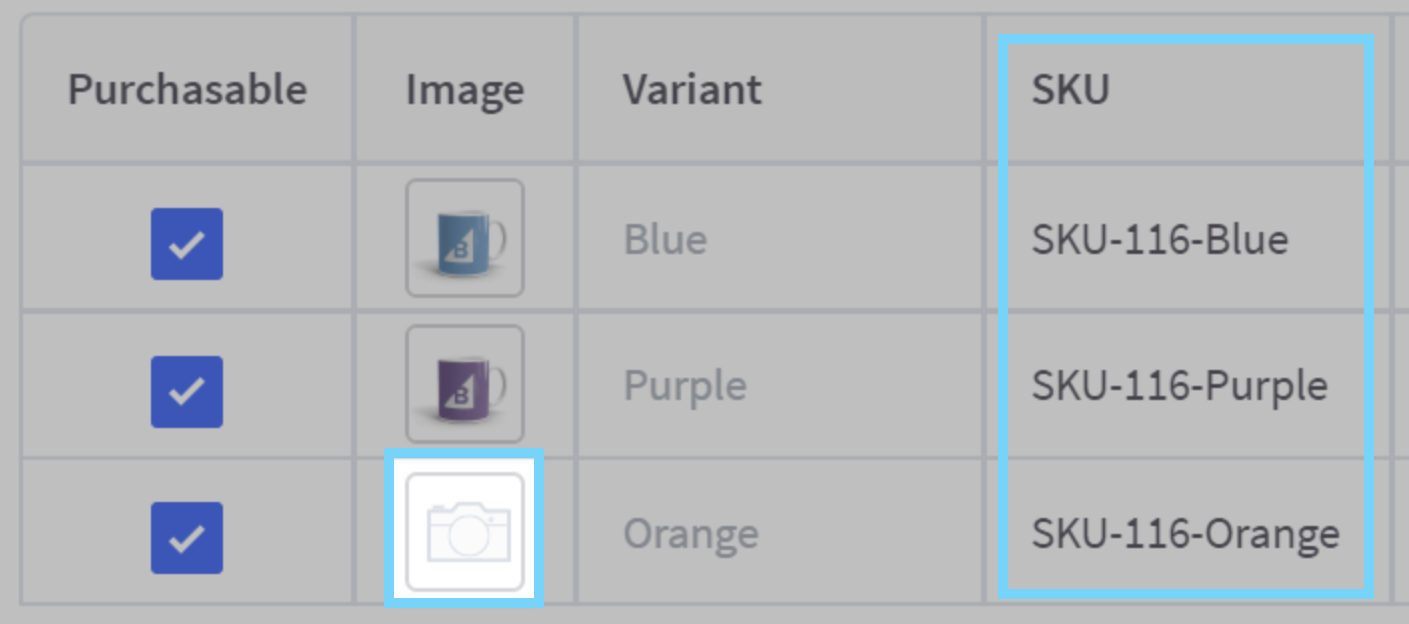
SKU
Stock keeping units, or SKUs, are alphanumeric codes used to differentiate variants and annals inventory. When you lot add together a new variant pick, SKUs for all new possible variants are automatically generated. You can edit the automatically created SKUs to add custom identifiers.
Variance image
- If you want to use a different epitome for a variant, click the camera icon underneath the Epitome column.
- By default, variants will use the master image for the product.
- A variant can only accept one epitome assigned to it.
2. Apply Shared variant options
Suppose you accept multiple products that share the same variant options and values. In that case, you tin save time by configuring the option one time and reusing it through multiple products using shared variant options.
- On the product level, shared variant choices cannot exist modified or personalized.
- Editing a shared variant option updates all applicable products; variants with specific SKUs are automatically regenerated.
- If they are currently associated with a commodity, shared version choices cannot be removed.
Steps to set up a Shared variant option
- To set up a new shared variant option, go to Products, so Product Options and click on Create Shared Variant Option.
- To edit an existing 1, click on the menu button (⋯) beside information technology and choose Edit.
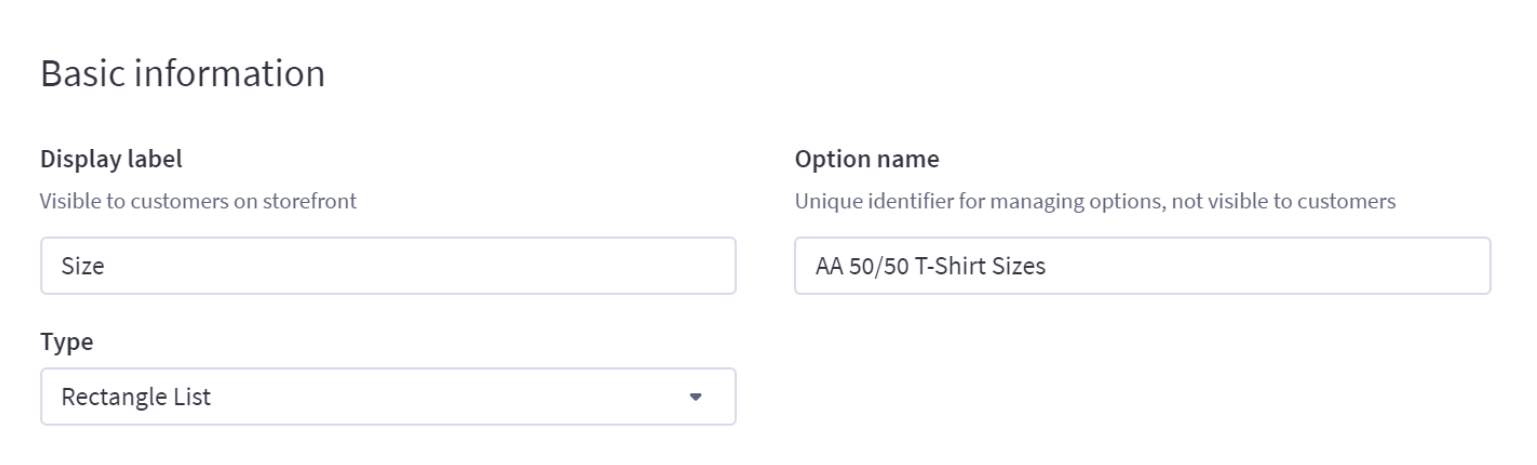
- Display label Describes the option visible on the storefront.
- Option name: Identify this shared variant pick in the control console (it is invisible on the storefront).
- Blazon: The display type of the selection on the storefront (Dropdown, Radio Buttons, Rectangle List, or Swatch).
To configure the Values for your option, click and drag the handles (⋮⋮) next to values to conform their sort guild on the storefront, then click on Save when end.
Implementing a Shared variant pick
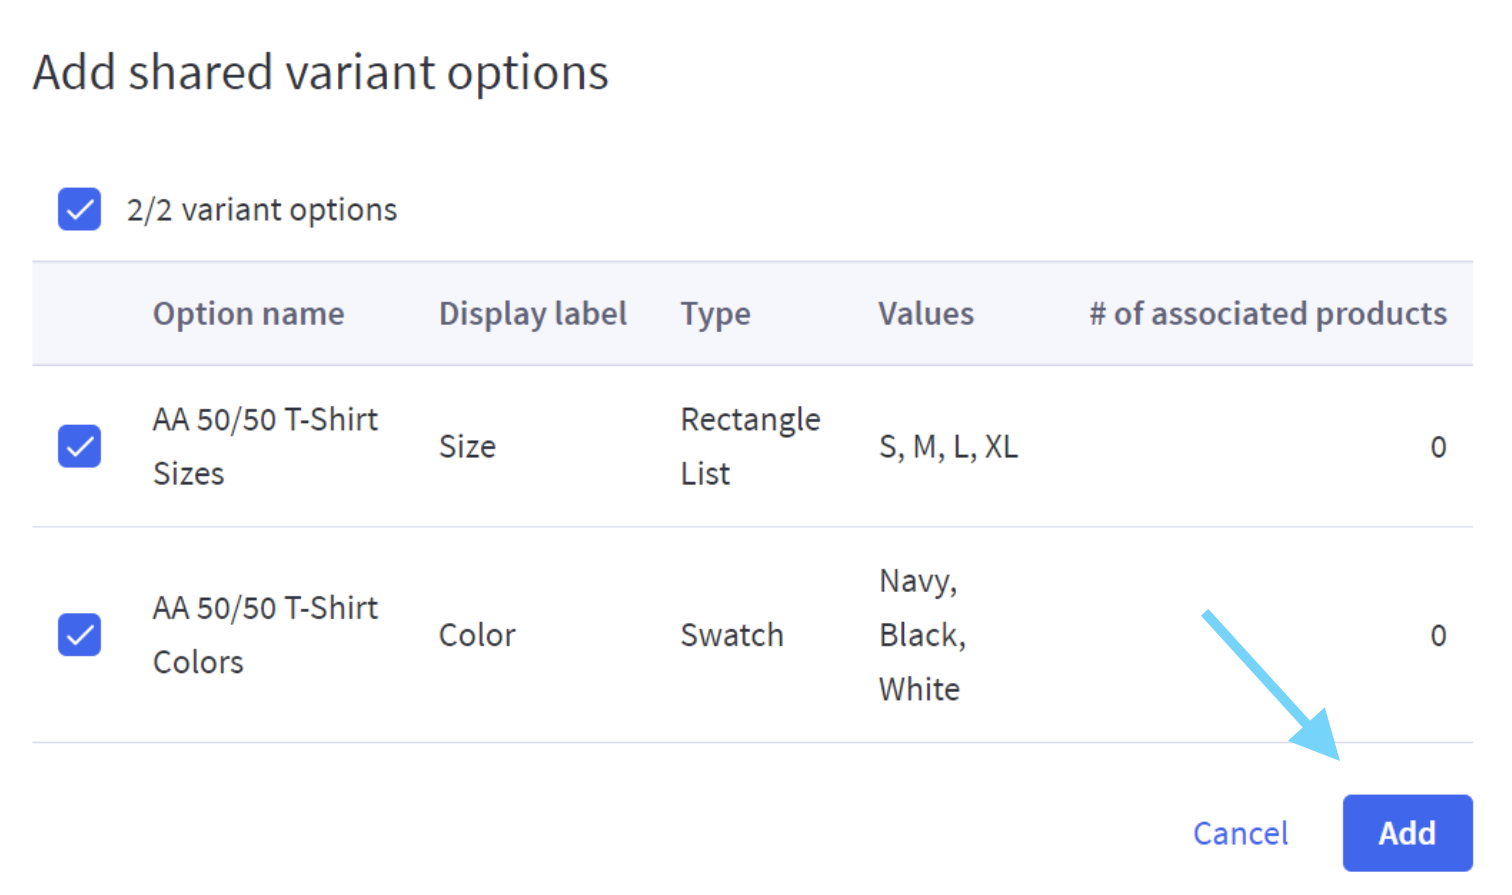
- When creating or updating a product, click Add together Variant Option and then Add together Shared Variant Options nether Variants.
- Select which shared variant options to implement by checking the box to the left of them and selecting Add. When washed, click Salvage Variants.
3. Create/Alter Customizations
Customizations are used to adjust items (or variants) and have a mechanism for changing their price or weight on a conditional basis. For instance, if you sell customized items, y'all could have a checkbox that charges an additional $five if customers choose to add their name and a text field for them to enter it.
Since customizations are used to change existing items or variants rather than creating new ones, they lack SKUs and stock. They can be mandatory or optional. Modifier options can be displayed in a diversity of ways on your storefront, depending on their functionality.
- Multiple Choice: Enable shoppers to choose from a listing of available values. They can be used to present an upgrade as an alternative.
- Pick List: Enables shoppers to choose from a list of boosted items in your itemize.
- Other: Enable the creation of checkboxes and other fields that allow shoppers to enter additional product information. A checkbox, text/number fields, date field, and file upload are all examples of types.
Add a Modifier pick

A modifier option is the portion of a customization choice in which a shopper communicates. Information technology can take the form of a checkbox, text box, or file upload button. If you want any of your modifier options to affect the overall price or weight of the product when they are picked, you tin practice then with a Rule.
- Click on Add Modifier Pick to create a new i, or click Configure Options to update an existing one.
- Assign a proper name to your option, specify its display type, and specify the values that should be available. Additionally, you tin can specify default text for engagement and text styles. To add additional values, choose Add Another Key.
- One time washed, press Create Options.
Add a Rule
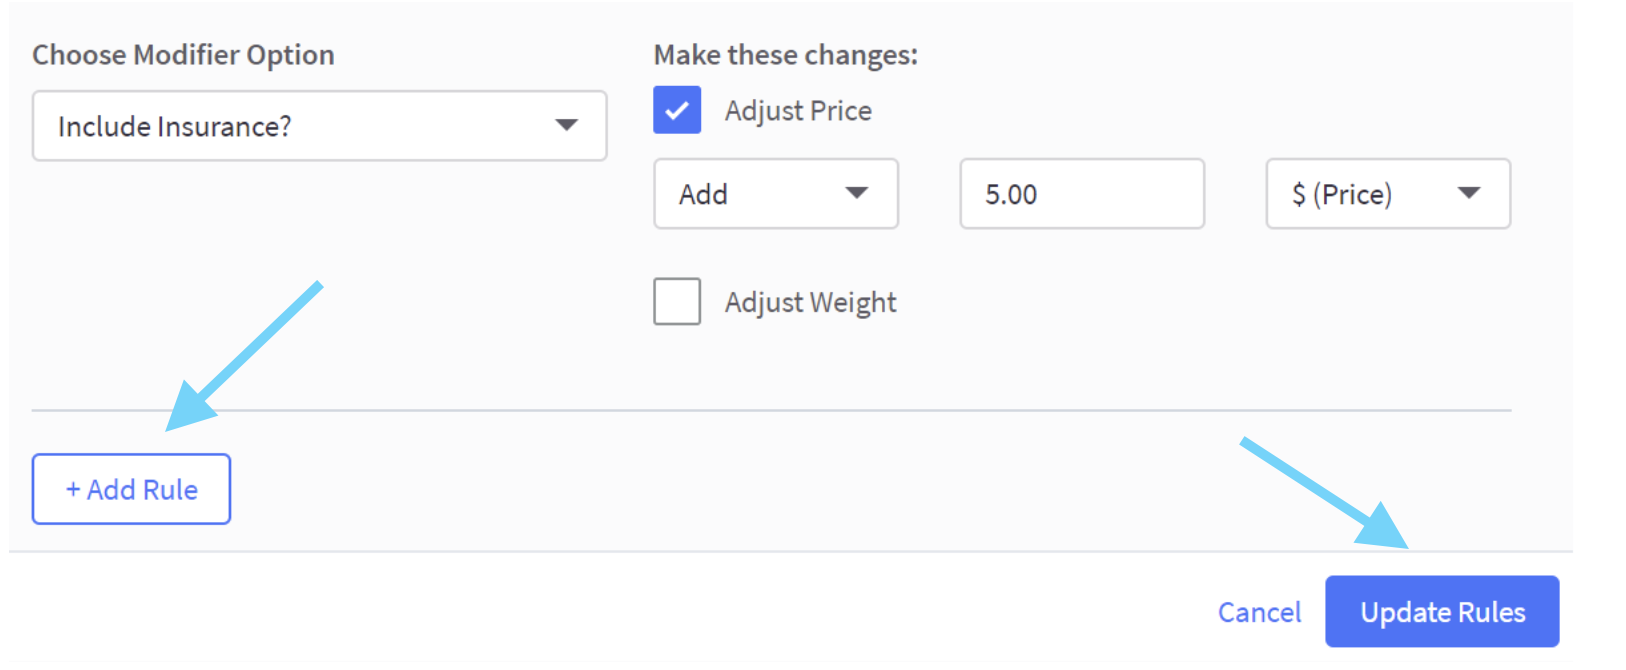
To begin, configure the modifier option to which the rule would apply, and then click + Add Dominion. Select Configure Rules to update an existing law.
Cull the Modifier Selection to which the dominion will utilize.
If the Modifier Choice is a multiple-choice one, you must likewise specify which values will activate the rule When this is selected.
Nether Brand these changes, you can configure how the price or weight should be changed if the Modifier is chosen.
4. Use Shared modifier options
Suppose you have multiple products that share the same modifier options and values. In that case, yous can salvage time by configuring the option once and reusing it across multiple products using shared modifier options.
- Modifier options that are shared between products cannot be modified or personalized.
- By editing a shared modifier option, all products to which information technology is applied will be updated.
- If a shared modifier option is currently associated with a production, it cannot be removed.
Steps to set upwards a Shared modifier option

- To gear up a new shared modifier choice, go Products, so Production Options. Click on the tab for Shared Modifiers, and so select Add Shared Modifier Pick.
- To edit an existing one, select the carte du jour push (⋯) beside it and click on Edit.
- Display name: Describes the option and is visible on the storefront.
- Modifier Option Name: Identify this shared modifier option in the control panel (it is invisible on the storefront).
- Blazon: Choose the display type of the selection on the storefront.
- To configure the Values for your choice, click and elevate the handles (⋮⋮) side by side to values to modify their sort society on the storefront. Click on Save when yous finish.
Implementing a Shared modifier choice
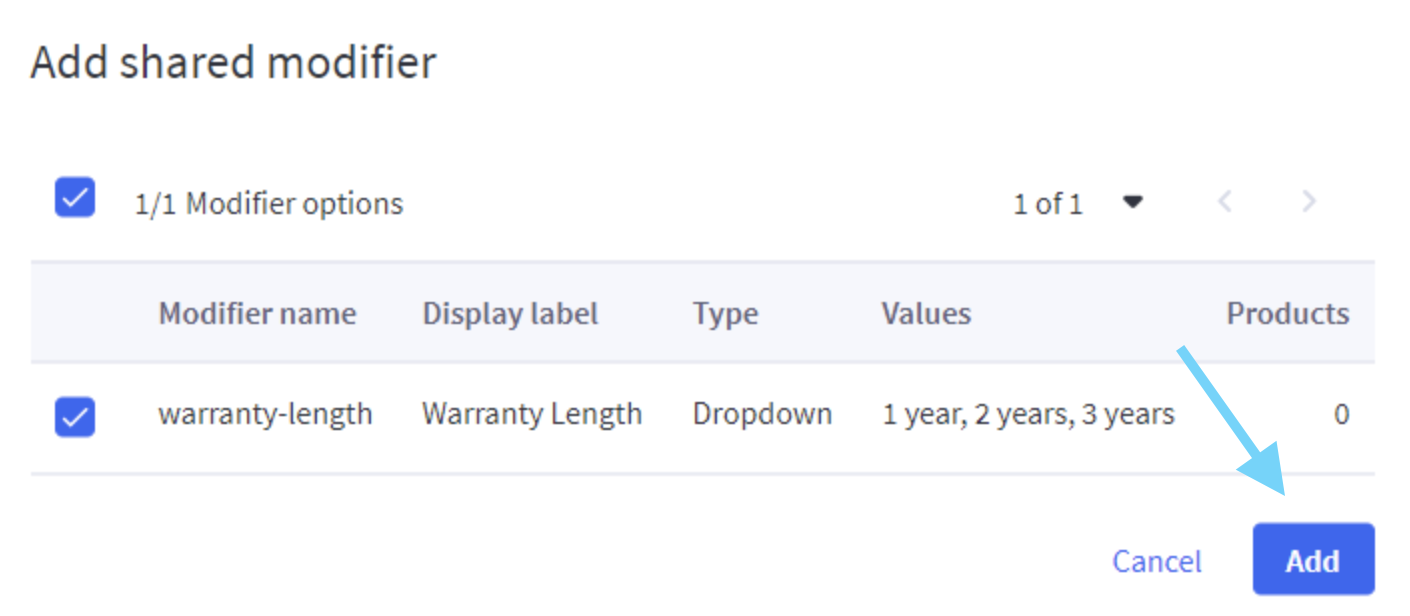
- When creating or editing a product, click on Add Modifier Option and and then Add Shared modifier options under Customizations.
- Select which shared modifier options to add by checking the box to the left of them and selecting Add. When done, click on Create Options.
5. Set up Multiple choice options
Multiple selection options let shoppers to choose a specific value for items that come in a variety of variants, such as colour or size. They can exist produced in ii means: through Variations or through Customizations.
If the variants of your production have SKUs or inventory, we propose using the variant choice.
A single product can take up to 600 singled-out SKUs/variants. We suggest using a modifier option if your product has more than than 600 variations.
Each variant has its ain explicit price. If your pricing strategy entails increasing or decreasing a base effigy/toll, you can accomplish this by the use of modifier rules. Rules should be used only for modifier options, not with variants.
six. Utilize the Checkbox
This is the most basic blazon of modifier option, and it can be used in a variety of applications. A checkbox pick is often used to provide an extended warranty on a specific production. A checkbox combined with a rule may be used to upsell a like accessory or service.
- Field Value: Text that appears to the right of the checkbox ("Yes" or "Include").
- Checked by default: Bespeak whether the box is automatically checked when a shopper enters the production description tab.
7. Modify Text/number fields
Buyers tin can enter email, messages, or numbers using these modifier choices. Text fields are sometimes used to create personalized gift letters or to personalize items such as engraving or embroidery.
When creating a text field option, you lot may specify the maximum number of characters, lines, and the type of data that the client can enter (alphanumeric or numeric-only).
Text field
This is a straightforward single-line text field. It is commonly used to store the names or messages associated with customized items. Text fields are case-sensitive and support both letters and numbers.
- Default Value: You lot can specify a default value for your text field if y'all wish. This tin can deed as an firsthand visual cue to shoppers well-nigh the type of data stored there.
- I want to limit the number of characters entered: Check this box if your text field choice has a character limit. Yous may specify a minimum, maximum, or both lengths.
Multi-line Text field
This option is similar to a text field, except that it includes a wider area with several lines for longer content. Forth with the characters that tin can exist entered, you can also specify the number of lines.
Number-only Text field
This is similar to a text field, except that it accepts only numeric characters (not letters).
- Default Value: Specify a default value for your numbers-only field if you wish. This can act equally an immediate visual cue to shoppers about the blazon of data stored there.
- Limit numbers by: Set a maximum, minimum, or range of permitted numbers here.
- I want to allow but whole numbers: If this box is checked, decimal numbers (such as 1.5) are not permitted.
8. Set the Date field
This type of modifier option enables shoppers to pick a date from dropdown menus for the month, 24-hour interval, and year. They are often used for time-sensitive items or those that need a personalized delivery date.
- Default Value: Specify a default value for your date field if you wish.
- Limit Date By: Optionally assign an Earliest Date, a Latest Date, or a Engagement Range.
9. Manage the File upload
Shoppers can upload a file using this modifier selection. This is typical for customized items. The uploaded file is included in the customer's order information and can be accessed during the order verification process.
The File upload section includes:
- Maximum File Size: The largest file that shoppers can upload. This cannot exist greater than 524,288KB.
- File Types: Allow shoppers to upload any file type or restrict them to specific file types, such equally photographs and photos, text files and documents, and other distinguished extensions you want to permit with a comma. For instance, pdf, mp3, and goose egg.
File Uploaded by the customers:
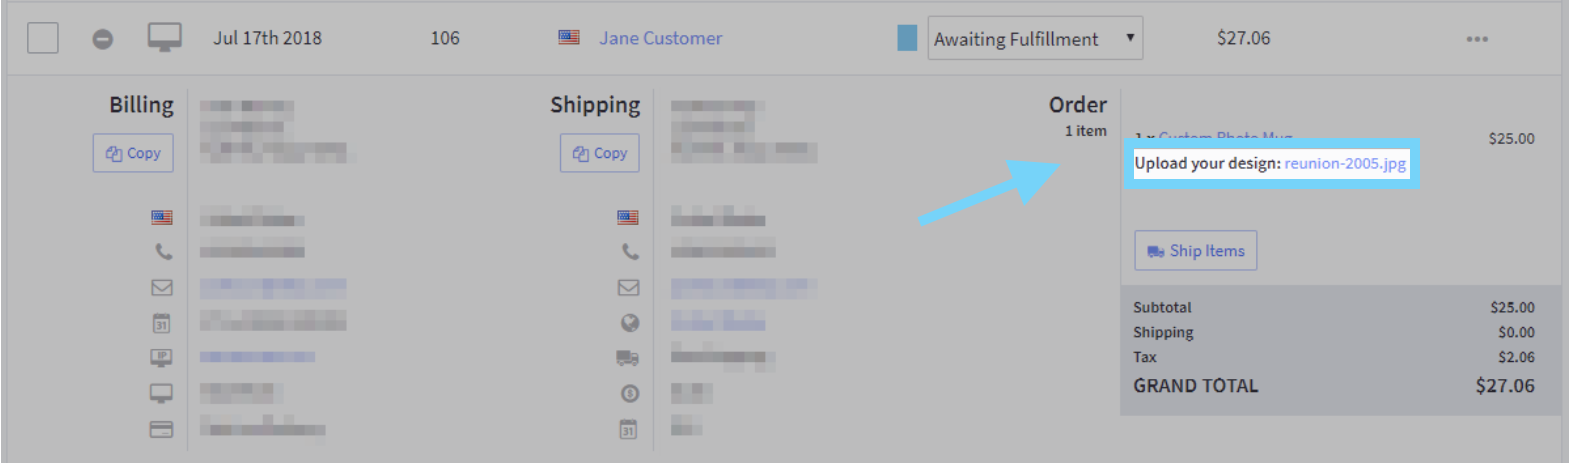
- When viewing orders, y'all can access and import customers' uploaded files from the cart contents specified in the expanded order data.
- To delete files uploaded past customers, you must log in to your store via WebDAV. The files are located in the folder product images/configured products.
ten. Modify the Pick lists
This course of modifier option enables shoppers to browse your store'due south inventory. This characteristic tin be used to upsell related items and add together-ons, as well as to packet products.
- Prove product picture on Storefront: Select this option to include thumbnails of products in the catalog.
- Change inventory for these items when purchased: If the products in your list monitor inventory, bank check this box to indicate that ownership through the pick listing should adjust their inventory.
- Price aligning based on the chosen option: If checked, the cost of the selected picklist product will be added to the base production. When this option is unchecked, choosing a production from the listing has no effect on the cost.
- Factor chosen product into delivery calculations
- None: The selected production does not affect the base product's weight or package dimensions (length, width, and/or height).
- Packet: The dimensions of the chosen option list product will be practical to the package dimensions of the base product.
- Weight: The weight of the selected pick list item will exist applied to the base product weight.
Restrictions
- A option list can incorporate only simple products (i.e., products without options). When looking for items to add to a select list, products with choices are not shown.
- A shopper can pick only one item from a list at a time; multiple items cannot be selected from the aforementioned listing. Downloadable appurtenances are not eligible for inclusion in a option list.
xi. Importing and exporting production options
Except for shared variants, the majority of the variations and customizations that tin can be created in the control console can also be created through a CSV file import. When exporting production choices, the way the data is interpreted in the consign file differs slightly from how information technology is displayed in the control panel.
For more than particular on how exported options look and how to format new options for import, read through this article. Additionally, you tin can apply the Catalog API to build and edit product options.
FAQ

What happens if I rename an selection set's associated option?
Changing the prove name of an option does non automatically update the selection's name inside an Selection Set up. This is deliberate conduct. Within the Option Set, option display names may exist inverse to preserve the original display name for utilise in other choice sets.
If a change to an selection's brandish name changed all option sets that used that option, merchants would be prevented from customizing option set display names for item purposes.
Why is my production not included in the production pick list?
Choice lists for items that have whatever of the following attributes do not work:
- Product Options
- Downloadable products
- Event dates
- Configurable fields
Products that take options or configurable fields cannot be applied to a production pick listing selection or a discount law, every bit there is no mode to make up one's mind an option or configurable field the consumer tin can choose.
Tin can I configure add-on items from the pick list to appear as a separate line item in the cart/checkout/invoice?
No, add-on items for the pick list exercise not appear equally separate products, simply every bit an option on the base product.
What happens if I modify a product'due south choice set?
Changing a production's choice gear up deletes all associated SKUs or product-level rules. Changes to a current or alive production'due south choice gear up should be made with caution, every bit removed SKUs or rules can merely be restored manually or from a backup.
How do I remove uploaded files from customers?
If your product allows customers to upload their ain files (via the File Upload Field product option), the file will be stored on the server. To delete the file, you must beginning log into your store via WebDAV and delete it from the server. The files are located in the product images/configured products subdirectory.
May I use special characters in SKUs (such as @, #, $, and percent )?
Yes! Nonetheless, the storefront search does not parse search strings for special characters. If your customers are searching for SKUs based on a partial match, BigCommerce suggests fugitive special characters in SKUs.
May I reorder the variation list for a product so that colour appears before size?
Yes! You tin can rearrange the variations listing past clicking Configure Options, then clicking and dragging the option name (for instance, reordering color before size) or value (green before blueish), and then saving your adjustments. When editing the product and showing it on the storefront, this will update the list lodge of the variants.
Tin can the pricing ranges for storefront products contain out-of-stock variants?
Yeah! Customers can see cost points for all of your models, fifty-fifty those that practise non have inventory. To ensure that your product'south pricing ranges are correct, we suggest either including prices for out-of-stock versions or but eliminating them and allowing them to inherit the base of operations product's toll.
Conclusion
In this article, nosotros try to conclude everything you demand to know about the BigCommerce Product Pick, including how information technology works, which aspects can exist modified, as well as how to set upwardly and adjust different factors in the v2 and v3 Production Selection.
After reading our work, we hope you will understand more about Production Options and apply them to your own BigCommerce shop.
Practise y'all find this commodity helpful? If you do, please share our work with everyone who may need information technology. Sharing not but helps to spread the noesis just also shows your support for the author.

Source: https://avada.io/bigcommerce/docs/product-options.html
0 Response to "Bigcommerce Pick a Size and Upload a File"
Post a Comment